What’s the best way to organize data into multi-layered categories? For example, suppose I have a grocery store. I have an Alcoholic Beverages category, and I want to create sub-categories for Beer, Wine and Liquor. But I only want those subcats to be available when Alcoholic Beverages is selected as the main category; they should not be valid for other categories like Produce or Spices, which will have their own subcats.
1 Like
Hi Maggie,
Check out this template as an example of creating primary and secondary categories;
https://templates.getgrist.com/pwGTfus26ck8/Expert-Witness-Database/p/5
The page labeled “Primary Fields” is an entry list where you would add the top level category. For the grocery store example, this would be where you would list Alcoholic Beverages, Produce, Spices, Dairy, etc.
The page labeled “Secondary Fields” is where you can create your list of secondaries linked to a primary. The Primary column is a reference column that pulls data from the Primary column of the “Primary Fields” table. Set up this reference column then create secondaries for each of your primaries. For example, in the first column select Alcoholic Beverages for the first three rows in column 1 then add Beer, Wine and Liquor as secondaries in column 2.
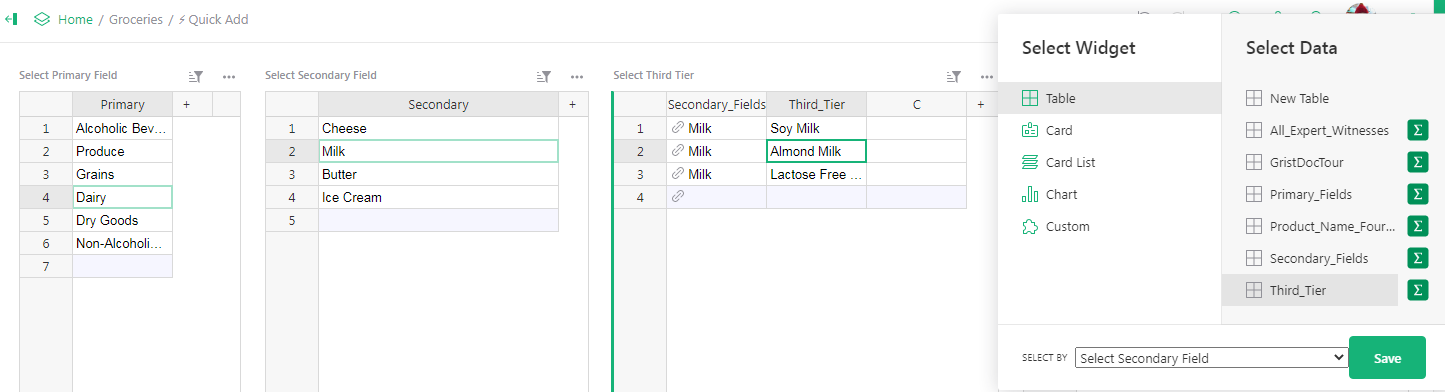
This all comes together on the “Quick Add” page. The first table allows you to select a primary field which then filters the “Secondary” table to only show secondaries linked to that primary.
To create the “Select Primary Field” table from the Quick Add page, select Add New > Widget = Table > Data = Primary_Fields
To create the “Select Secondary Field” table from the Quick Add page, select Add New > Widget = Table > Data = Secondary_Fields
Please note that you can quickly add a Primary Field or Secondary Field from the Quick Add page and it will update the Primary Field page or Secondary Field page accordingly.
I hope this helps!
-Natalie
1 Like
Hi Natalie,
So far so good. Now what if I want to add a second nested level? For example, I want to break down the wine further into Red, White and Rose. I’ve tried doing it, but it seems like I can only link my third table using one field – either the primary category from table 1 or the secondary category from table 2, but not both. So now my ‘Red’ entry is linked to Wine from table 2, but the primary field is blank. Does it matter? If I am entering transactions at this level, will they still roll up into the Alcoholic Beverages primary category?
Hey Maggie!
You can do a second nested level and even a third! I created an example with 4 levels here; Alcoholic Beverages > Wine > Red Wine > Merlot. I built this onto the same example above but changed the existing entries to grocery items. I have included all the names to my pages, tables and columns. If you name yours the same, it may be easiest for adding the formulas at the end but feel free to change them as desired. At the end when you make your fourth tier selection, it will fill in the primary, secondary and third tier fields. For example, if you select Merlot, it’ll roll all the way up into the Alcoholic beverages primary category.
Assuming we have the first and secondary fields following the steps above, we will next add our third tier. Under the green Add New button, select Add Empty Table. the new page is named “Third Tier” and the table is named “Tier_Three”. Column A will be a Reference type, pulling data from the Secondary column of the Secondary_Fields Table.
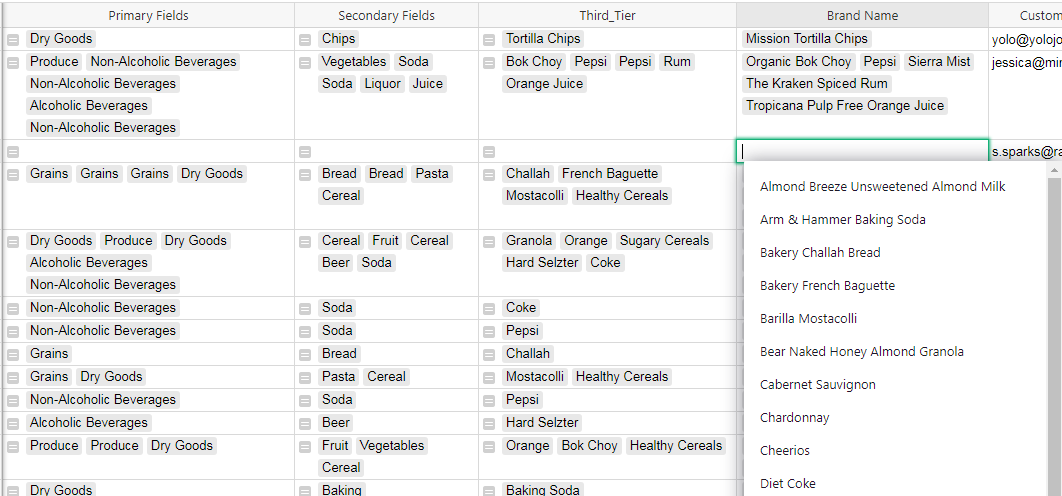
Rename the column to Secondary_Fields. Column B will be named Third_Tier. Select items in Column A then provide the third tier names in Column B. For Example, my first three rows are all “Cereal” in column A and Column B has “Granola”, “Sugary Cereals” and “Healthy Cereals”.
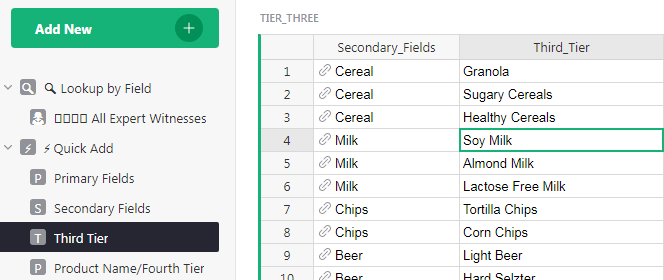
We can add our Third Tier to our “Quick Add” page just as we did for the primary and secondary fields. To create the “Select Third Tier” table from the Quick Add page, select Add New > Widget = Table > Data = Third_Tier > Select by “Select Secondary Field” > Save. Now, you can select your Primary (Dairy) then only the secondaries for Dairy appear. I select Milk for my secondary so only my third tier items for Milk appear (Soy, Almond and Lactose Free).
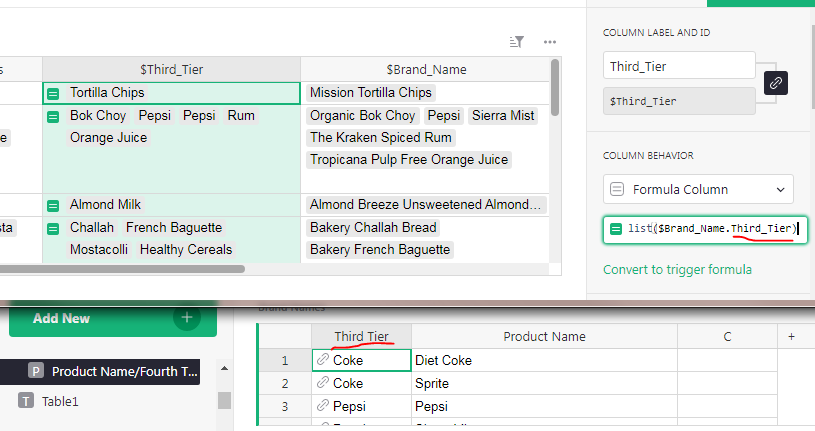
Now to create our fourth and final tier - we will need to add another new table. Add New > Add Empty Table. I have named my new table “Brand Names” and the page is named “Product Name/Fourth Tier”. Row A is named “Third Tier”. this is a Reference type column, pulling data from the Third_Tier column of the Third_Tier table. Row B is named Product Name
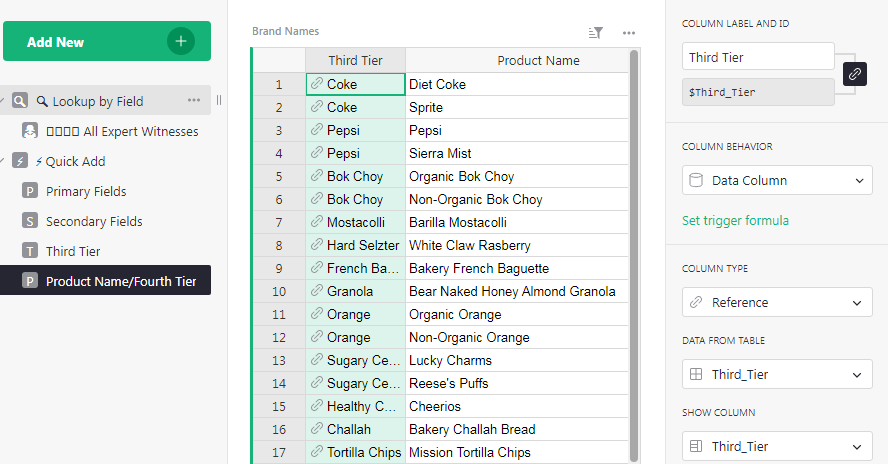
Let’s add this to the Quick Add page. Add New > Widget = Table > Data = Product_Name_Fourth_Tier > Select By = Select Third Tier > Save. Name this table “Select Product Name”. Feel free to “hide” the first column. We already know what it’s third tier title is since we have the Third Tier table to the left of it.

One last thing we can do - Navigate to the “All Expert Witnesses” Page - since this was the name from the template, I left as is. We are going to update this to include our new third and fourth tiers. It’ll work similarly - we’ll just have four levels. We’ll pick our brand names - as if we are ordering groceries online and this is creating the shopping list for the person grabbing our order. It’ll list out the depts/areas where the food is, making it easy to shop for - or if you are trying to track sales for a department, you could do that too! Here’s what the final product will look like;
Let’s set this up now. All four columns will be Reference List columns. Add columns as needed, details for each below;
Primary Fields: Data from Table = Primary_Fields > Show Column = Primary
Secondary Fields: Data from Table = Secondary_Fields > Show Column = Secondary
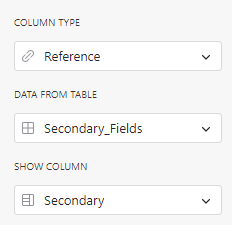
Third_Tier: Data from Table = Third_Tier > Show Column = Third_Tier
Brand Name: Data from Table = Product_Name_Fourth_Tier > Show Column = Product Name
Now we need to update the formulas for these columns - the Primary column will remain unchanged from the template but I’ve included the formula below just so you have it. To add a formula, click into the column, then under column options on the right hand side of the screen, select the dropdown for “Column Behavior” and choose “Clear and make into formula”. If you used the same names for tables and columns, you can enter the formula for each column as listed below by copy/pasting the text between the quotation marks;
Primary Fields: “list($Secondary_Fields.Primary)”
Secondary Fields: “list($Third_Tier.Secondary_Fields)”
Third_Tier: “list($Brand_Name.Third_Tier)” – as seen in screenshot below –
Brand Name: N/A
If you used your own names for tables and columns, know that the format is = list($A.B)
Where A is the name of the column of the next nested level on this table - so, the name of the column to the right of the one you are adding the formula to (For Example: I am adding a formula to Third_Tier so the column to the right is Brand Name)
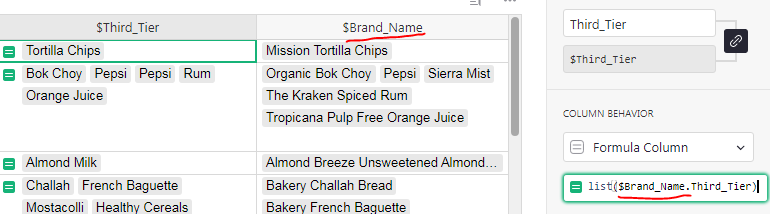
And B is the name of the column where the current tier (where you are adding the formula) is linked to the next nested level. (For Example: Third Tier is linked to Brand Name on the page named Product Name/Fourth Tier > the name of the column on this table is “Third Tier”.
And that’s it! You can add more tiers by following the same steps. The only change would be setting up the formulas at the end. Fourth Tier (Brand Name) would now have a formula using the fifth tier and so on. The final tier won’t use a formula since that is where you will make your selection.
Let me know if you have any questions going through this!
-Natalie
1 Like
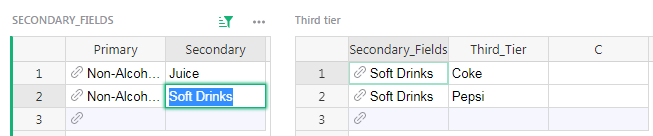
Ah, I get it. Each table links only to the one that’s one level above it in the hierarchy. Now, to satisfy my curiosity, tell me: if you were to rename one of those foreign key fields, would it lose all its subsidiaries or would it keep them? For instance, if you renamed ‘Soda’ to ‘Soft drinks’, would it now appear as an empty category while Coke and Pepsi are left to fend for themselves without a parent? Or is there an underlying non-editable key which provides the actual link and the text is just… well, text?
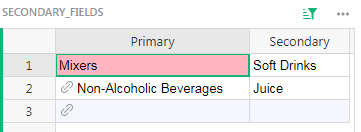
You can rename any field, just be sure to name it where it is first “called”. For example, Soda is a secondary field to Non-Alcoholic Beverages. So we need to update Soda where it is linked to it’s primary. That will be in our Secondary Fields table. In the screenshot below, I updated the highlighted text from Soda to Soft Drinks. This is where we first assign that secondary field. It auto updates the label in the Third Tier table, which we see on the right. If you wanted to update Coke to Coca-Cola, you could do so in the Third Tier table (on the right) because that is where it is first assigned. Whatever is in that field is then linked to our Fourth Tier items; Diet Coke and Sprite.
One key thing here to remember here - only update where there is not a link in the entry box. The with a link is a reference column so if you enter something that doesn’t exist in the column we are referencing, it’s going to turn the entry red as a warning. In the screenshot below, I updated the Primary column of the Secondary Fields table, our reference column. When I changed Non-Alcoholic Beverages to Mixers, it turned red because we do not have “Mixers” within the table that is being referenced.
-Natalie
Excellent idea to give a warning when the user does something illegal, thank you!
Now, what happens if a category doesn’t need any third tier entries but you still want to enter products into the fourth tier? For example, Ice. Come to think of it, Ice might not even need second tier entries. I’m guessing you need placeholder entries for the second and third tiers that say All or something similar. What if you have several categories like Ice that just need placeholders, and you use the word “All” for all of them? They won’t get mixed up, will they?
Correct, references are stored as a number representing a row ID, while the text is just the value in the corresponding record under the column chosen in the “Show column” setting.
Since the text “All” is just for display and not the actual value of the reference, different references can look like “All” while having different underlying values. If you select the correct references then everything will work fine. But different references looking the same can make it easy to accidentally pick the wrong reference, particularly when selecting from the autocomplete dropdown in the cell editor. If you select the correct bottom level category and the higher levels are selected automatically by formulas, then you should be fine.
Another way to approach this whole problem is to have a single Choice column with a large number of choices, with each choice covering all layers of categories, e.g. “Beverages > Alcoholic > Beer” and “Beverages > Alcoholic > Wine”. In this case I’m using " > " to separate each level, so the code $Categories.split(" > ") gives a list of strings like ["Beverages", "Alcoholic", "Beer"]. If for example you always have 3 levels of categories, then you can make 3 formula columns giving the category at each level:
$Categories.split(" > ")[0]→ Beverages$Categories.split(" > ")[1]→ Alcoholic$Categories.split(" > ")[2]→ Beer
I’m intrigued by the idea of using the split function, although it sounds like that will only work in conjunction with choices. In my experience, choices work well for a limited and static number of items but less well when the number is larger or the list is more volatile. I still might give it a try. It would compress the space needed for categorization when entering transactions such as sales or purchase orders, as opposed to the method used in the Expert Witness database where all the category tables have to be displayed.
Here’s another idea which should be better. It’s similar to the split approach but in reverse.
- Make a single Categories table with a column for each level of category, like before, but these are entered manually.
- Add a column with the formula
" > ".join([$Primary, $Secondary, $Tertiary])to combine all the category levels into a single string. - Make a reference column referring to the Categories table and showing the new formula column.
- Use “Add referenced columns” in the settings of the main reference column if you want to extract individual category levels.
2 Likes
This sounds like exactly what I am looking for. Gonna try it out now. Thanks to both of you for all your help!