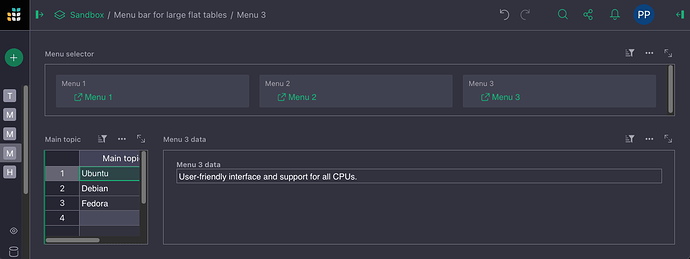
Based on the excellent post by Dmitry Sagalovskiy on the usage of anchor links and SELF_HYPERLINK’s, I expanded his solution to develop a simple menu navigation. It solves both, editing large tables with 120+ culumns, and ensures that the same record remains active when switching between pages in Grist.
You can download an example on my Github repository grist menu for large flat tables.
To test, open one of the menu pages, and select a “main topic” in the table to the left (Ubuntu, Debian, or Fedora). Click on the menu links in the “Menu bar” to open a new page with different information of the same topic.
In essence, I use 2 Cards of the same table, one for the menus, and one for the specific data to be displayed on the page. Not to forget Grist’s nice feature to duplicate Pages. I.e. you can prepare a master menu page for duplication.
This example makes use of the follwowing functionalities in Grist:
- Linking to cells: Copy anchor link
- SELF_HYPERLINK function.
- Card Widgets
- Editing card layout
- Renaming widgets
- Linking Widgets
- Formatting columns, in particular Hyperlinks
step-by-step
I do assume that you have rudimentary experience in using Grist’s tables, pages and fields navigation, respectively formatting. If, not please visit Grist Help Center and familiarize yourself with the key functionalities of Grist and/or watch the video tutorials.
- in your large table: add a column for each menu page you want to create. Theses columns will hold the links to your menu pages, call them, for example, “Menu 1”, “Menu 2”, …
- create a New Page in Grist using your large table
- rename the Page to, again, for example, “Menu 1”
- hide all columns except the selector field, i.e. your “Main topic”
- add 2 card widgets and relate (Select by) the data to the main table.
- place the first card widget on the top of your page, show only the Menu 1, Menu 2, … fields, choose Block formatting and edit the layout to display the fields from left to right, i.e. “Menu 1”, “Menu 2”, …
- place the second card widget to the right of selector table and choose the fields you want to display on this page.
- Optional but recommended, rename widget titles to
- Menu: “Menu selector”
- Table 1: “Main topic”
- specific data: “Menu 1 data”
Repeat steps 2. to 8. for as many “Menu” pages you require
To create the menu functionality:
-
Let’s start with page “Menu 1”. Right-click on the field “Main topic” in the main table and choose “Copy anchor link”.
-
Open a text editor, copy the link, and follow Dmitry Sagalovskiy’s example on the usage of anchor links and SELF_HYPERLINK’s. Turning the anchor link:
https://<your server address>/Menu-bar-for-large-flat-tables/p/2#a1.s4.r1.c5into the formula:
SELF_HYPERLINK(label="Menu 1", page=2) + "#a1.s4.r{}.c5".format($id) -
copy and paste the formula into the field “Menu 1” created earlier in your large table. Don’t forget to format the column as “Text” and change the cell format to "Hyperlink
Repeat steps 9. to 11. for all other Menu pages, and create SELF_HYPERLINK’s accordingly.
Result
Choose a “Main topic” in any menu and navigate to another Menu page: The record of the “Main topic” will remain selected.
Bonus for the lazy geek
In table Hyperlinks you can copy the Anchorlink in column “anchor” and it will generate above conversion automatically in column “SELF_HYPERLINK”. The string operations can be reviewed in the hidden columns.

