Release of Ultra Kanban Widget

https://rogerpenna.github.io/ultra-kanban-widget/index.html

Announcing the Ultra Kanban Widget: Visualize, Customize, and Automate Your Grist Workflow!

Hello Grist Community,

I’m excited to share a project I’ve been working on: the Ultra Kanban Widget!

If you love Grist but have been looking for a more visual and powerful way to manage your projects, tasks, or any workflow, this widget is for you. It transforms your Grist table into a fully interactive, feature-rich Kanban board directly on your page.

will record a video and post here in the future

What can it do?

The goal was to create a Kanban board that feels deeply integrated with Grist’s flexibility. Here are some of the key features:

  • Dynamic Drag & Drop: Move cards between lanes to instantly update your Grist data.

  • Detailed In-Line Editing: Click on any card to open a full “drawer” view. Edit any of your record’s fields—text, numbers, choices, references—without ever leaving your Kanban board. Your Grist table updates instantly when you save.

  • Manage Linked Records & Sub-tasks: Does your card link to other tables using Reference List columns? The drawer automatically displays these linked records (e.g., sub-tasks, comments, contacts) in a clean table. You can add new linked records, edit existing ones, or unlink them directly from the drawer, providing a complete master-detail view for your workflow.

  • Lane-Specific Field Visibility: This is the killer feature! You can show or hide different fields on cards depending on which lane they are in. For example, only show the “Approval” field when a card moves to the “Review” lane.

  • Advanced Card Layout: Highlight important information by pinning a Priority field to the top-right corner of a card and a Due Date to the bottom-right. It even displays Grist’s conditional formatting!

  • WIP Limits (Work-In-Progress): Set limits on how many cards can be in a lane to prevent bottlenecks. The lane header will turn red when the limit is reached.

  • Powerful Workflow Automation Rules: Automate your process without needing complex formulas.

    • Allow Rules: Set conditions that must be met before a card can enter a lane.
    • Auto-Move Rules: Automatically move a card to another lane when a condition is met.
    • Create Rules: Trigger the creation of new records in another table—perfect for creating sub-tasks or logging completed work.
  • Full Visual Customization: Change colors, layout, gradients, fonts, and more to make the board truly yours.


  • Multilingual: Supports English and Portuguese right out of the box.

Try It Out!

Getting started is easy.

  1. Add a Custom Widget to your Grist page.
  2. Paste in the URL: https://rogerpenna.github.io/ultra-kanban-widget/
  3. Click the :gear: Config button, select your language, and map your main “Status” column.

This widget was built to solve my own workflow needs, and I hope it can be just as useful for you. I would love to hear your feedback, suggestions, and any ideas you have for new features!

Happy organizing

4 Likes

https://rogerpenna.github.io/ultra-kanban-widget/

Getting Started with the Ultra Kanban Widget

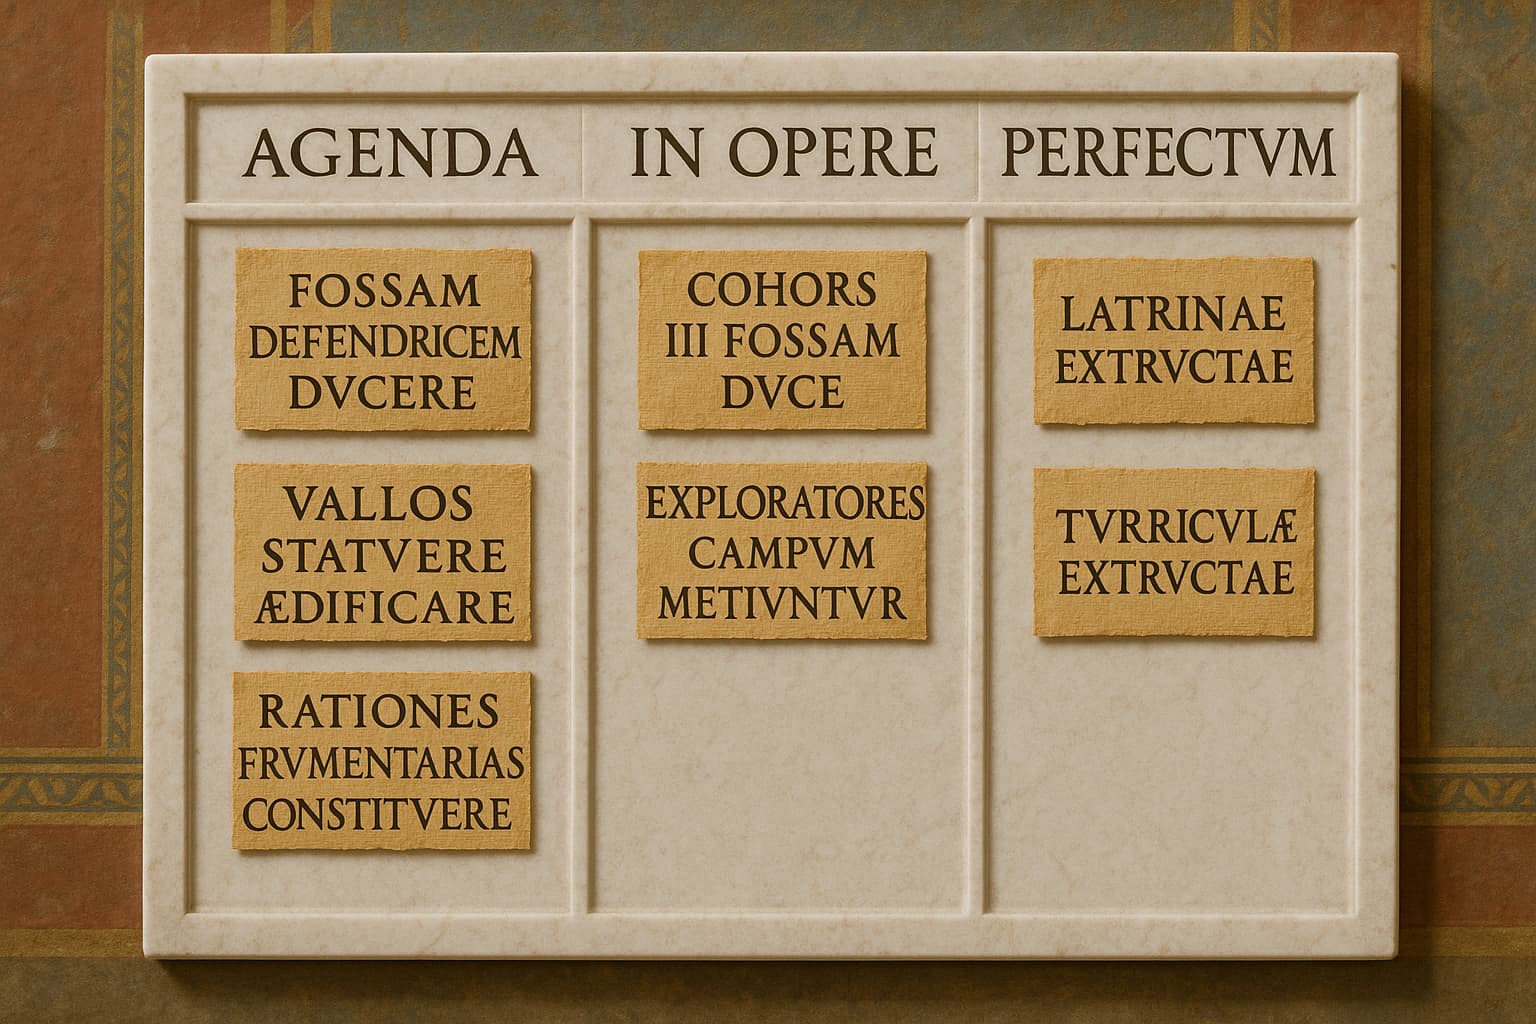
Welcome! This guide will walk you through setting up and using the Ultra Kanban Widget to supercharge your Grist workflow. With this tool, you can visualize your data as a dynamic, interactive Kanban board.

This widget is multilingual, and new languages may be added in the future. For the purpose of this tutorial, we will proceed using English.

Section 1: Initial Setup (Making it Work in 4 Steps)

Before you can use the widget, you need to tell it how to read your data.

Step 1: Add the Widget to Your Page

  1. Add a new widget to your Grist page and select Custom.
  2. Choose to display the Full Document.
  3. In the widget options on the right, paste the following URL:
    https://rogerpenna.github.io/ultra-kanban-widget/

You’ll likely see a message asking you to configure the widget.

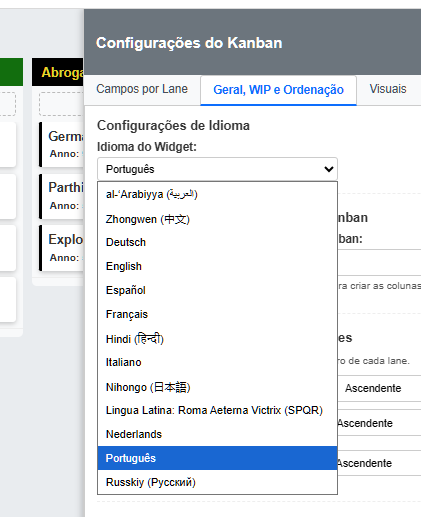
Step 2: Choose Your Language

  1. Click the :gear: Config button at the top right of the widget.
  2. Go to the “General, WIP & Sorting” tab.
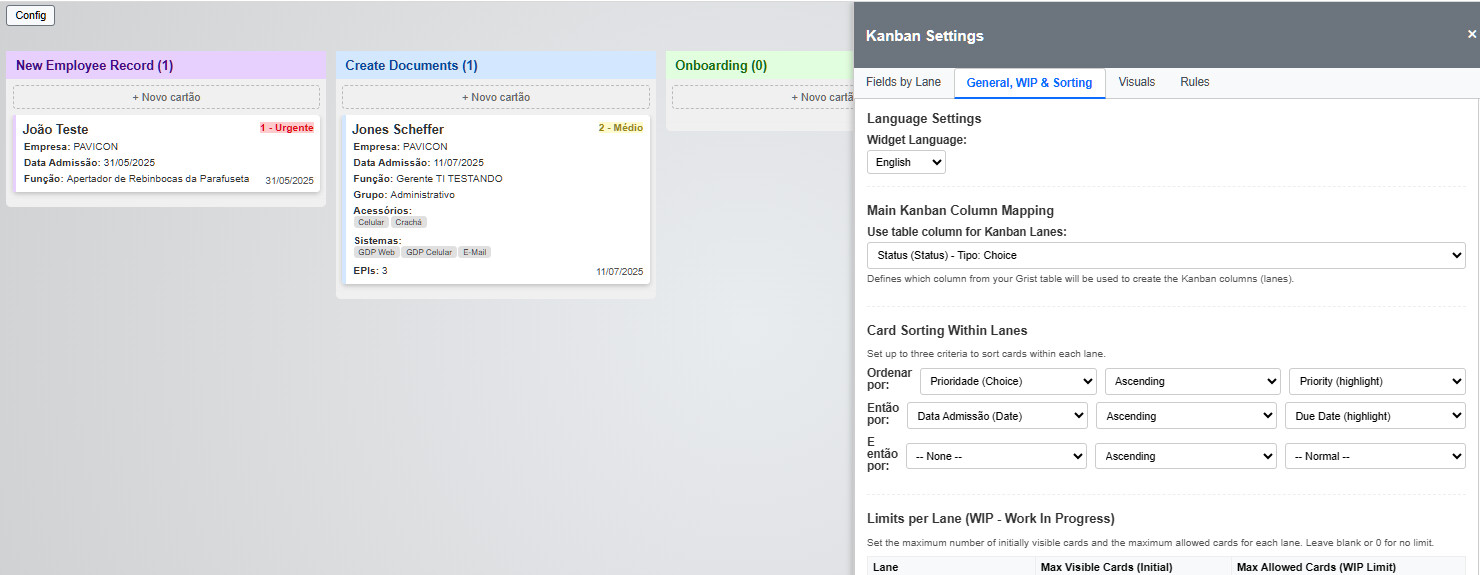
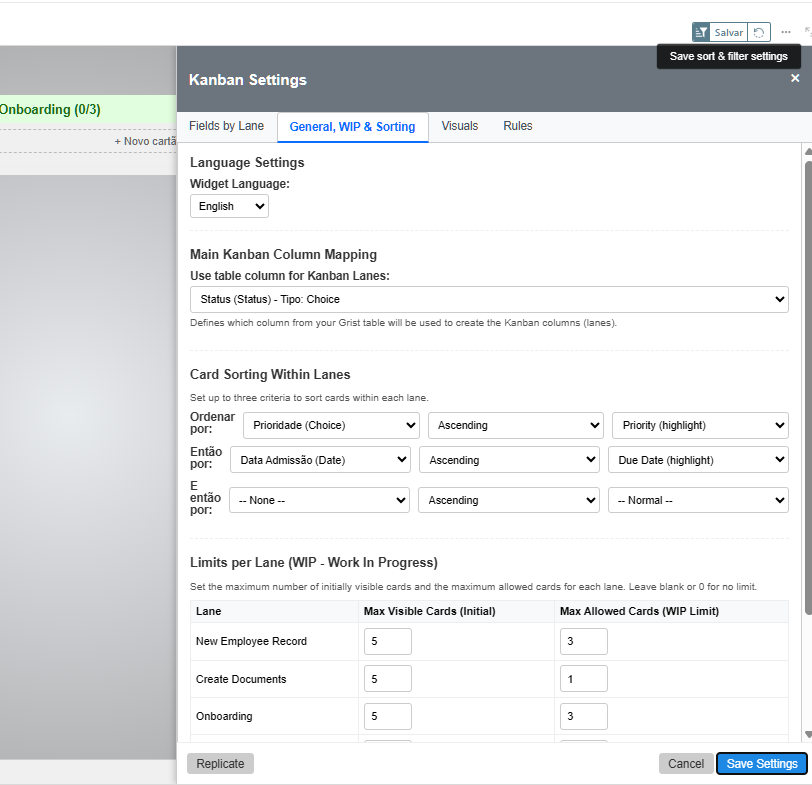
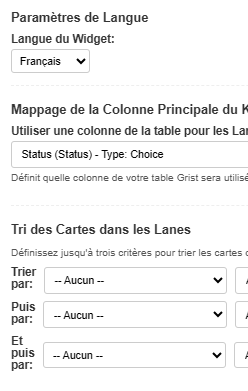
  3. The first section is “Language Settings”. From the dropdown menu, select English. The configuration menu will instantly translate.

Step 3: Prepare Your Grist Table

Your Kanban board is based on the columns of a single Grist table. The most important column is the one that defines the “lanes” of your board.

  • Ensure your table has a Choice or Text column that will represent the stages of your workflow (e.g., a column named “Status” with choices like “To Do”, “In Progress”, and “Done”). This will become your Kanban lanes.

Step 4: The Most Important Step - Map Your Kanban Column

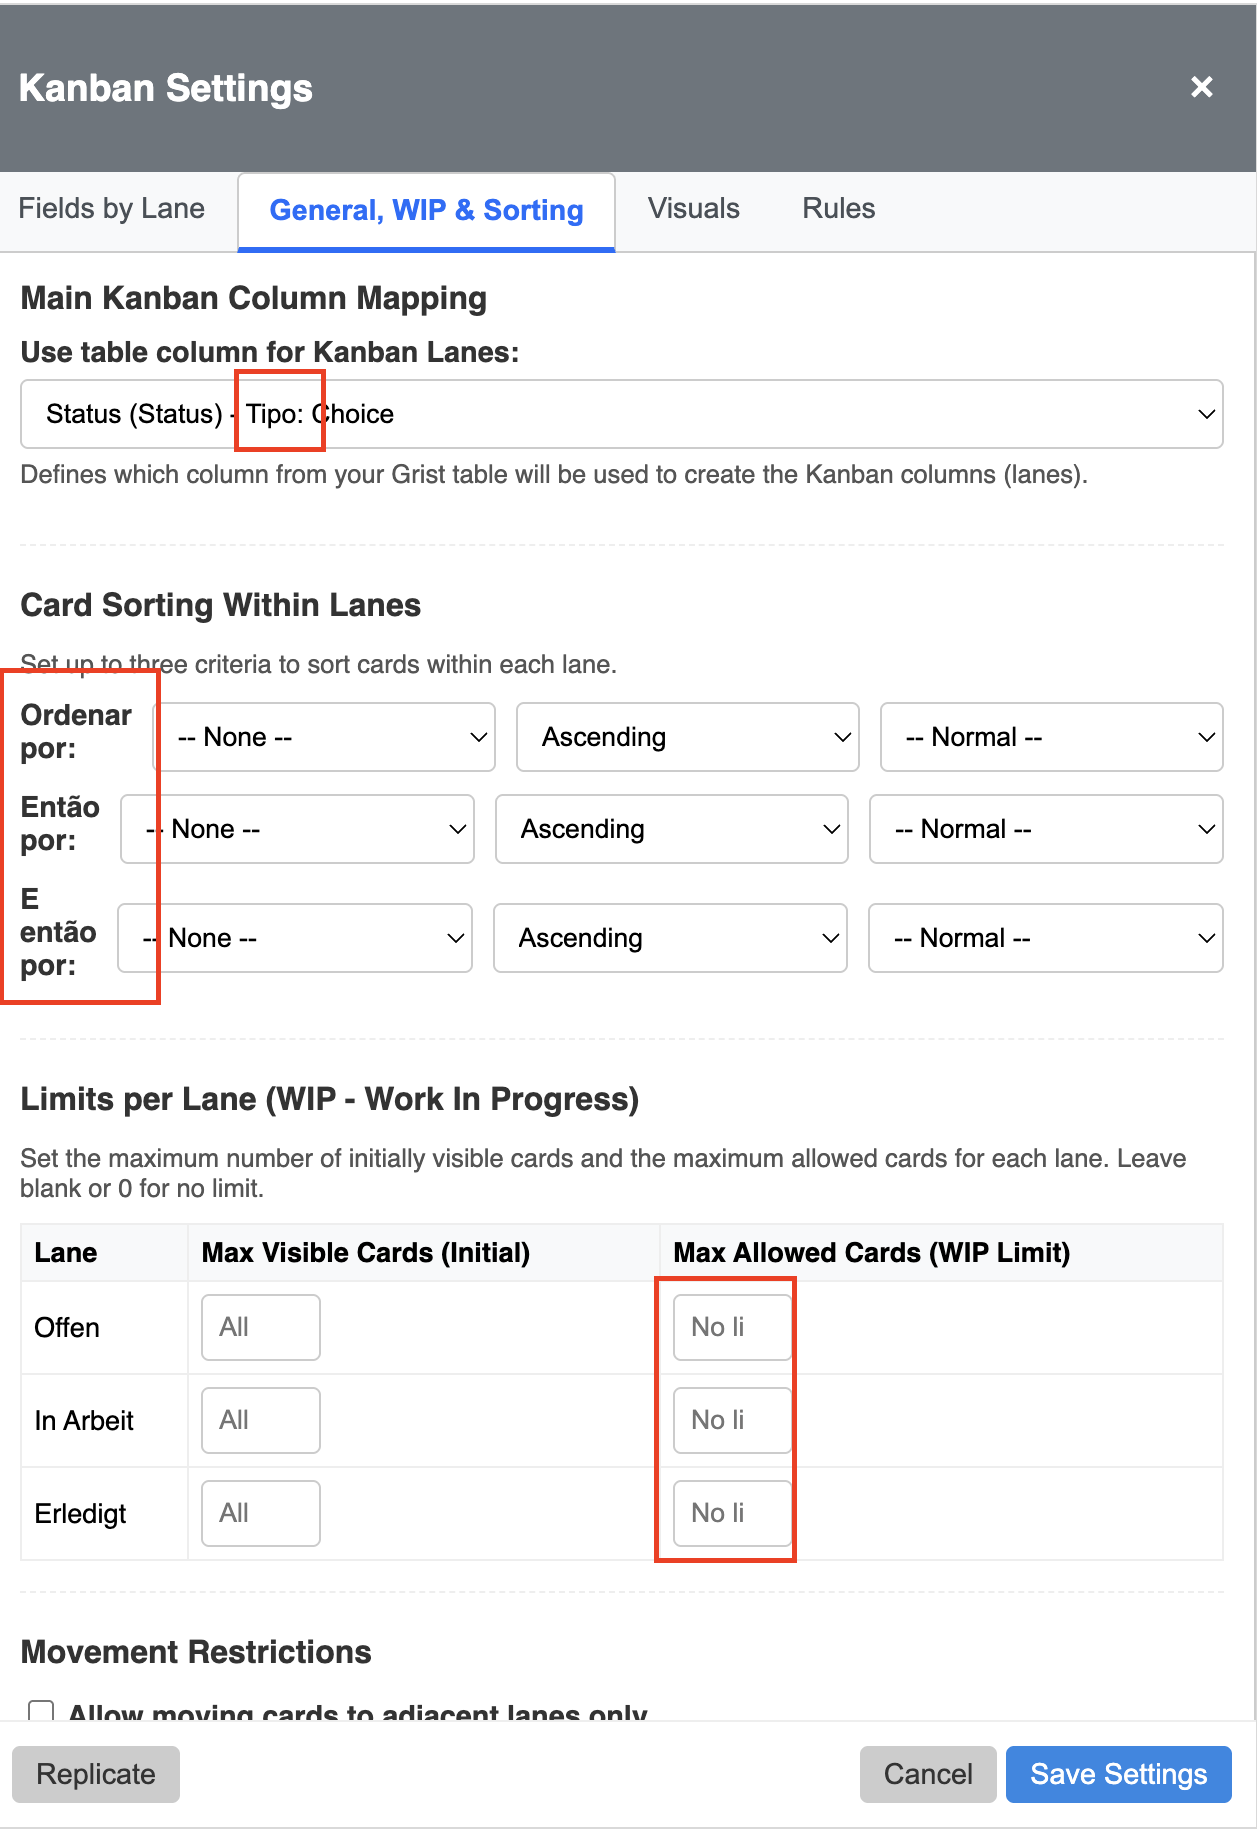
  1. While still in the “General, WIP & Sorting” tab, find the “Main Kanban Column Mapping” section.
  2. Click the dropdown menu and select the column from your table that contains your workflow stages (e.g., your “Status” column).
  3. Click the blue “Save Settings” button at the bottom.

:sparkles: 
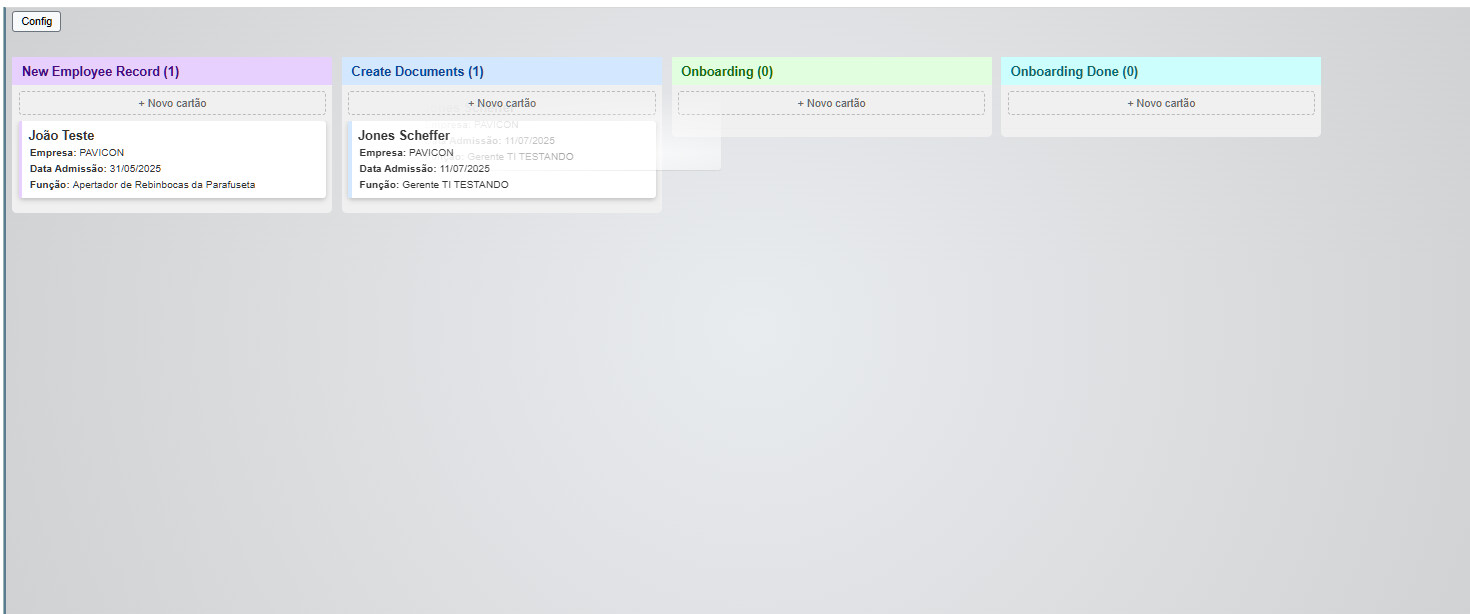
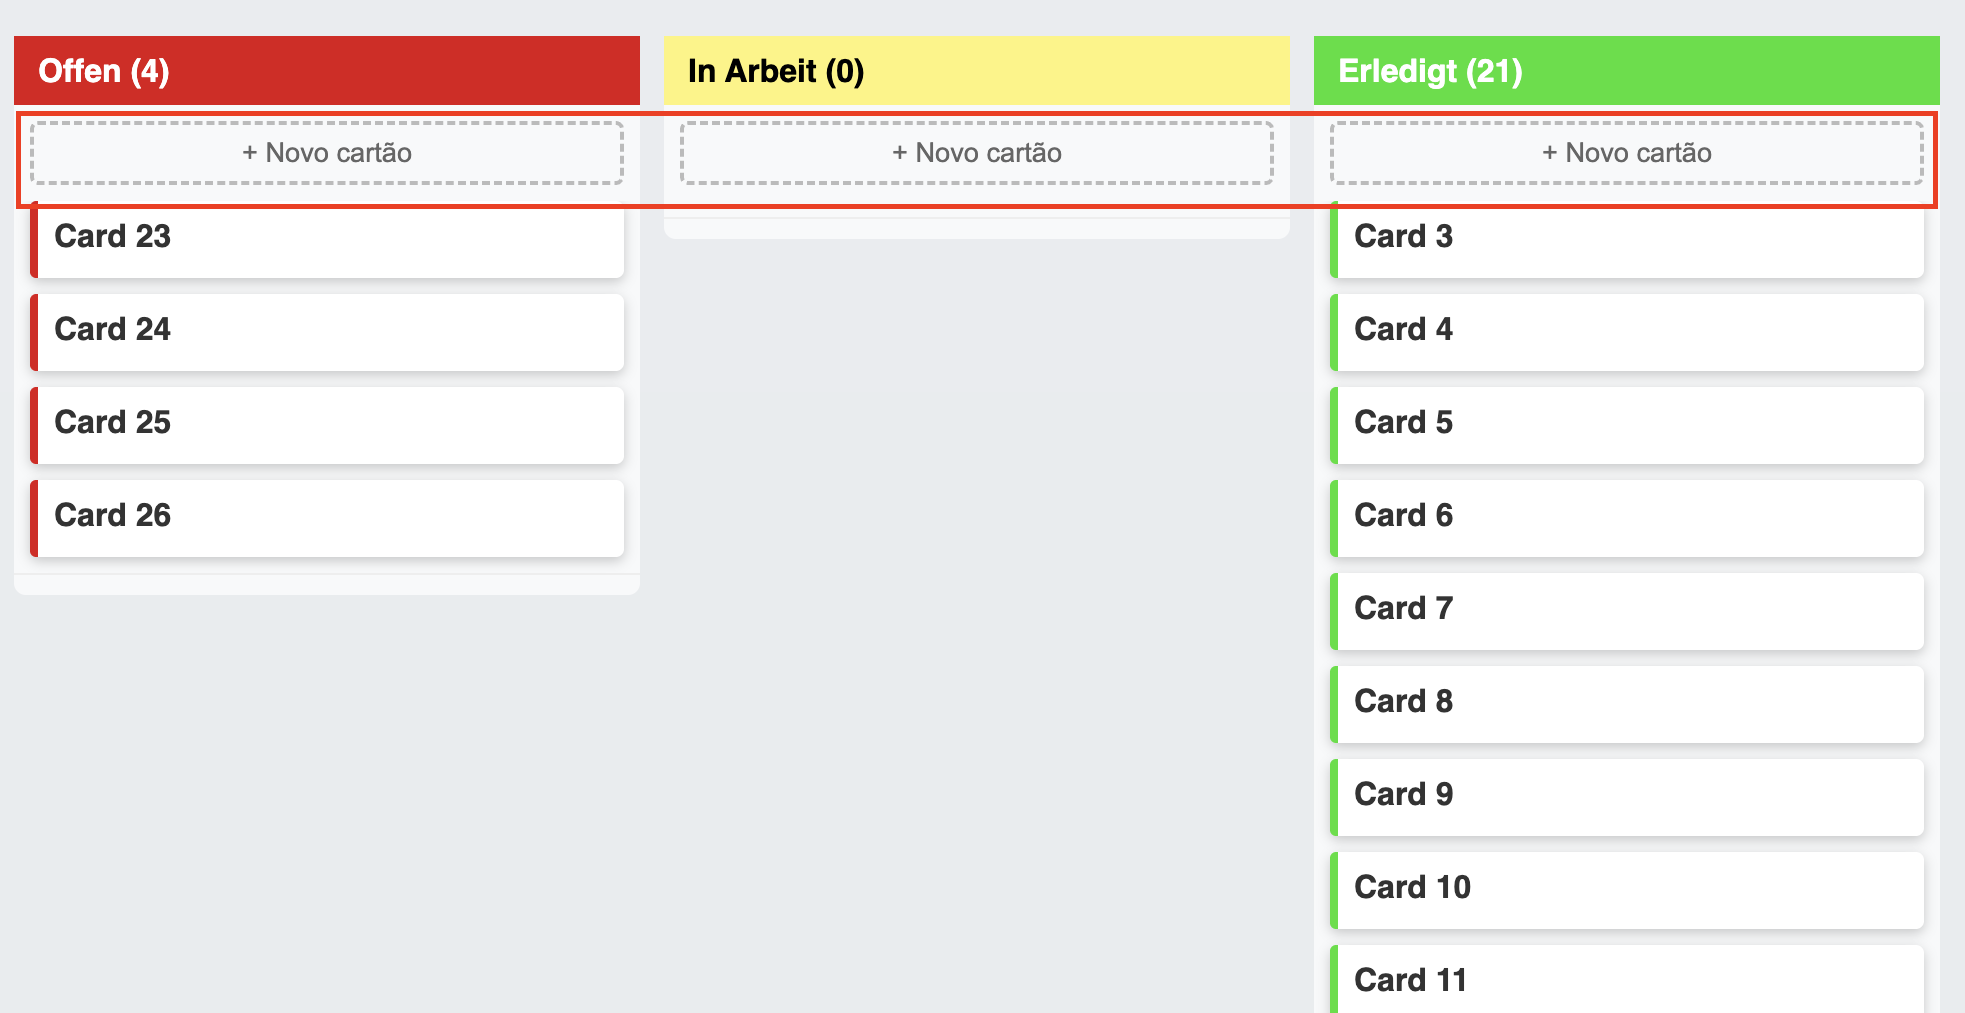
Congratulations! Your Kanban board should now appear, with columns matching the choices or values from the column you selected.

Section 2: Basic Usage

Now that your board is live, here’s how to use it:

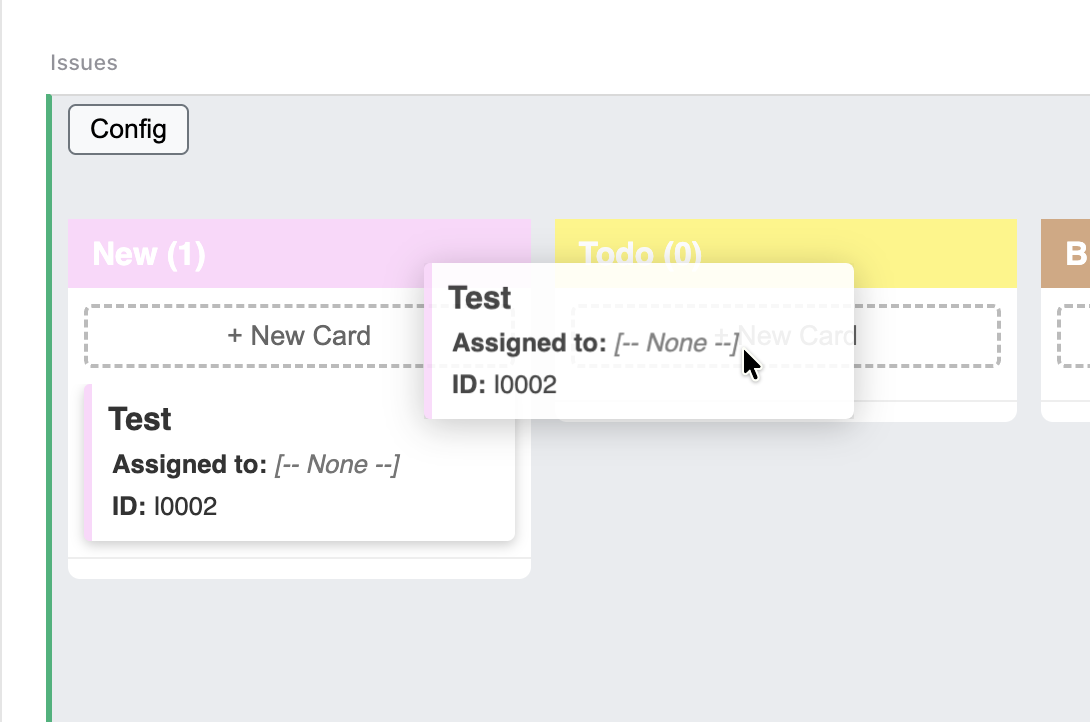
  • Move Cards: Simply click and drag any card from one lane to another. The data in your Grist table will update automatically.
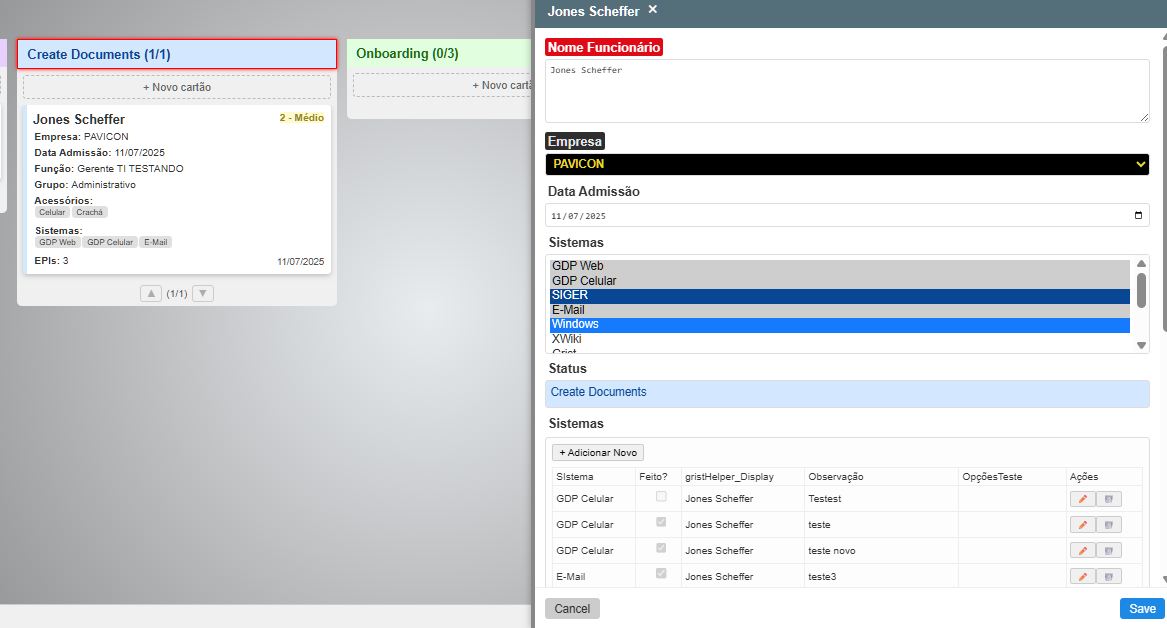
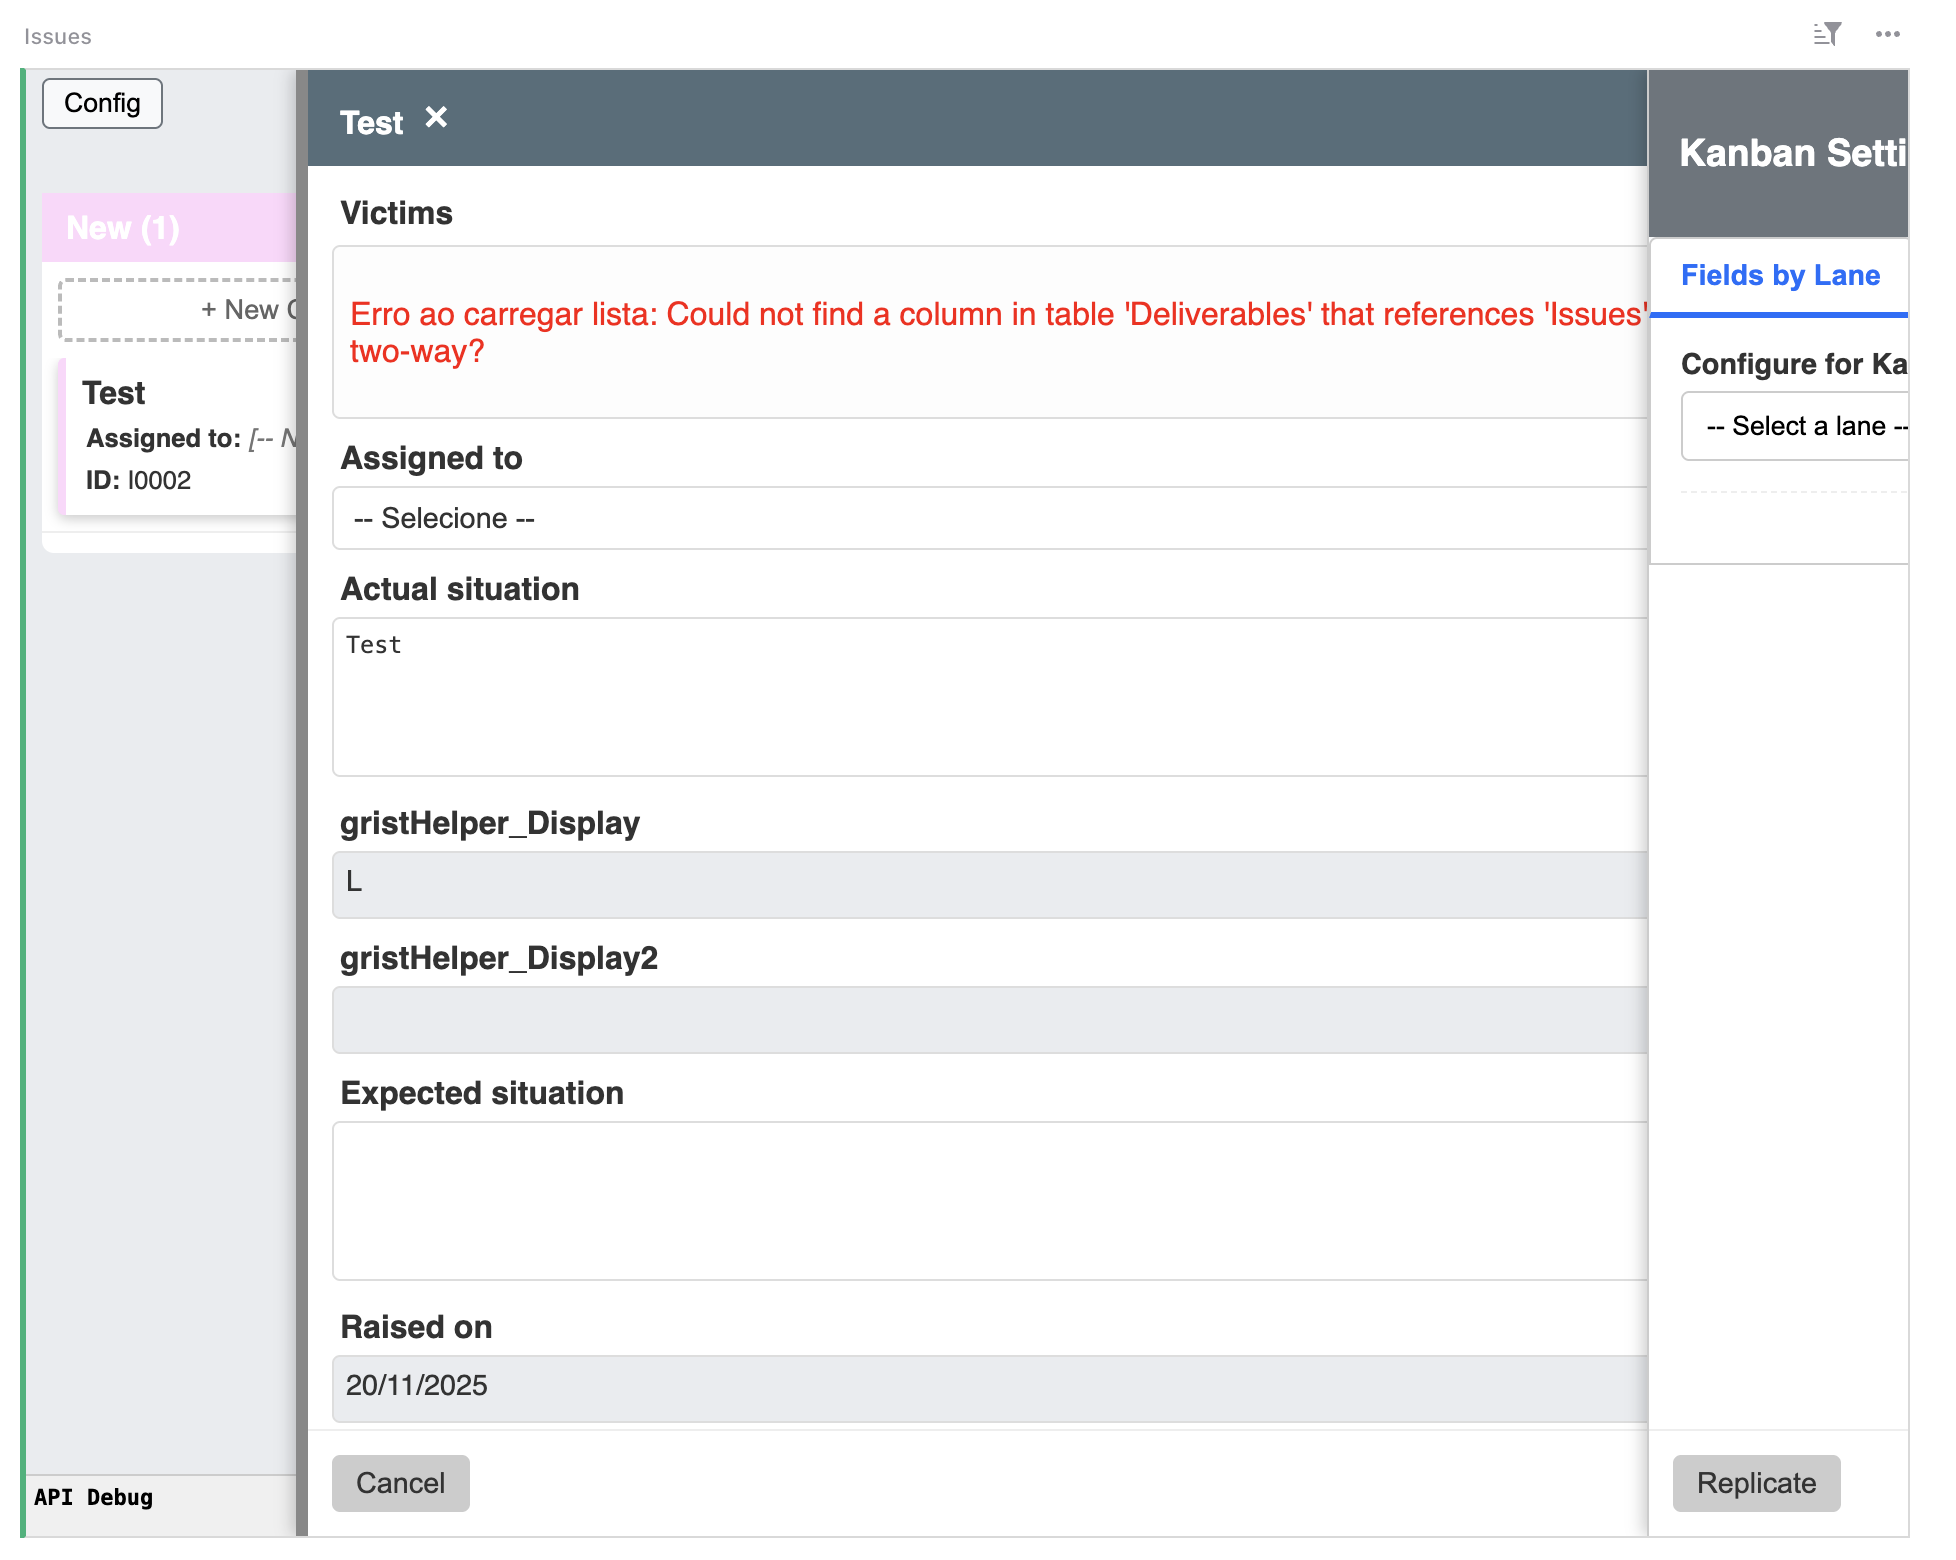
  • View & Edit Card Details: Click on any card to open a detailed “drawer” view on the right. Here you can see and edit all the fields related to that card. Click “Save” to update the record.

Section 3: Customizing Your Board (The :gear: Config Menu)

The real power of this widget lies in its customization options. Click :gear: Config to explore them.

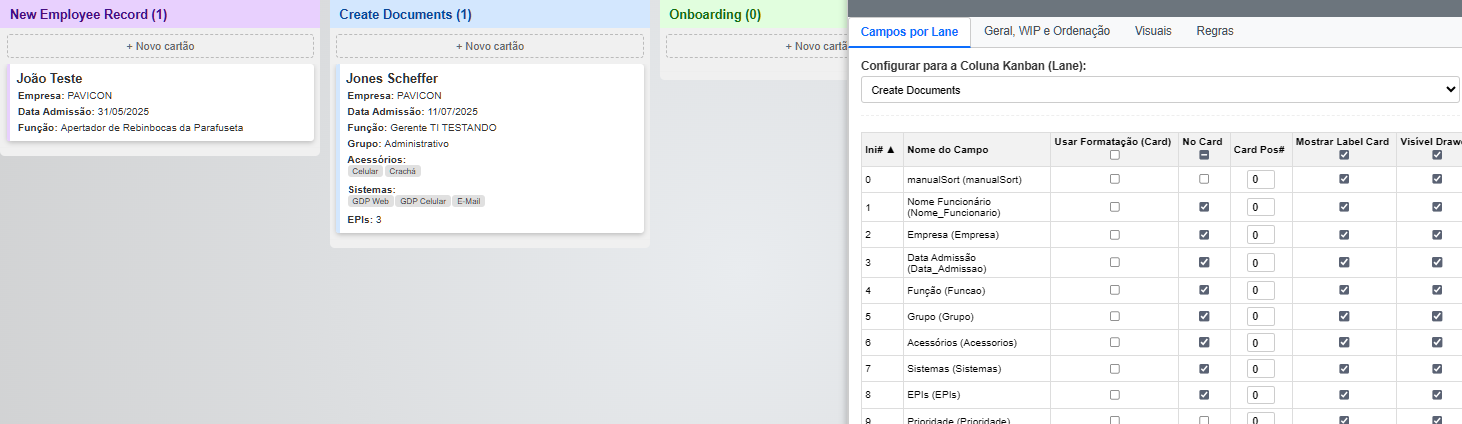
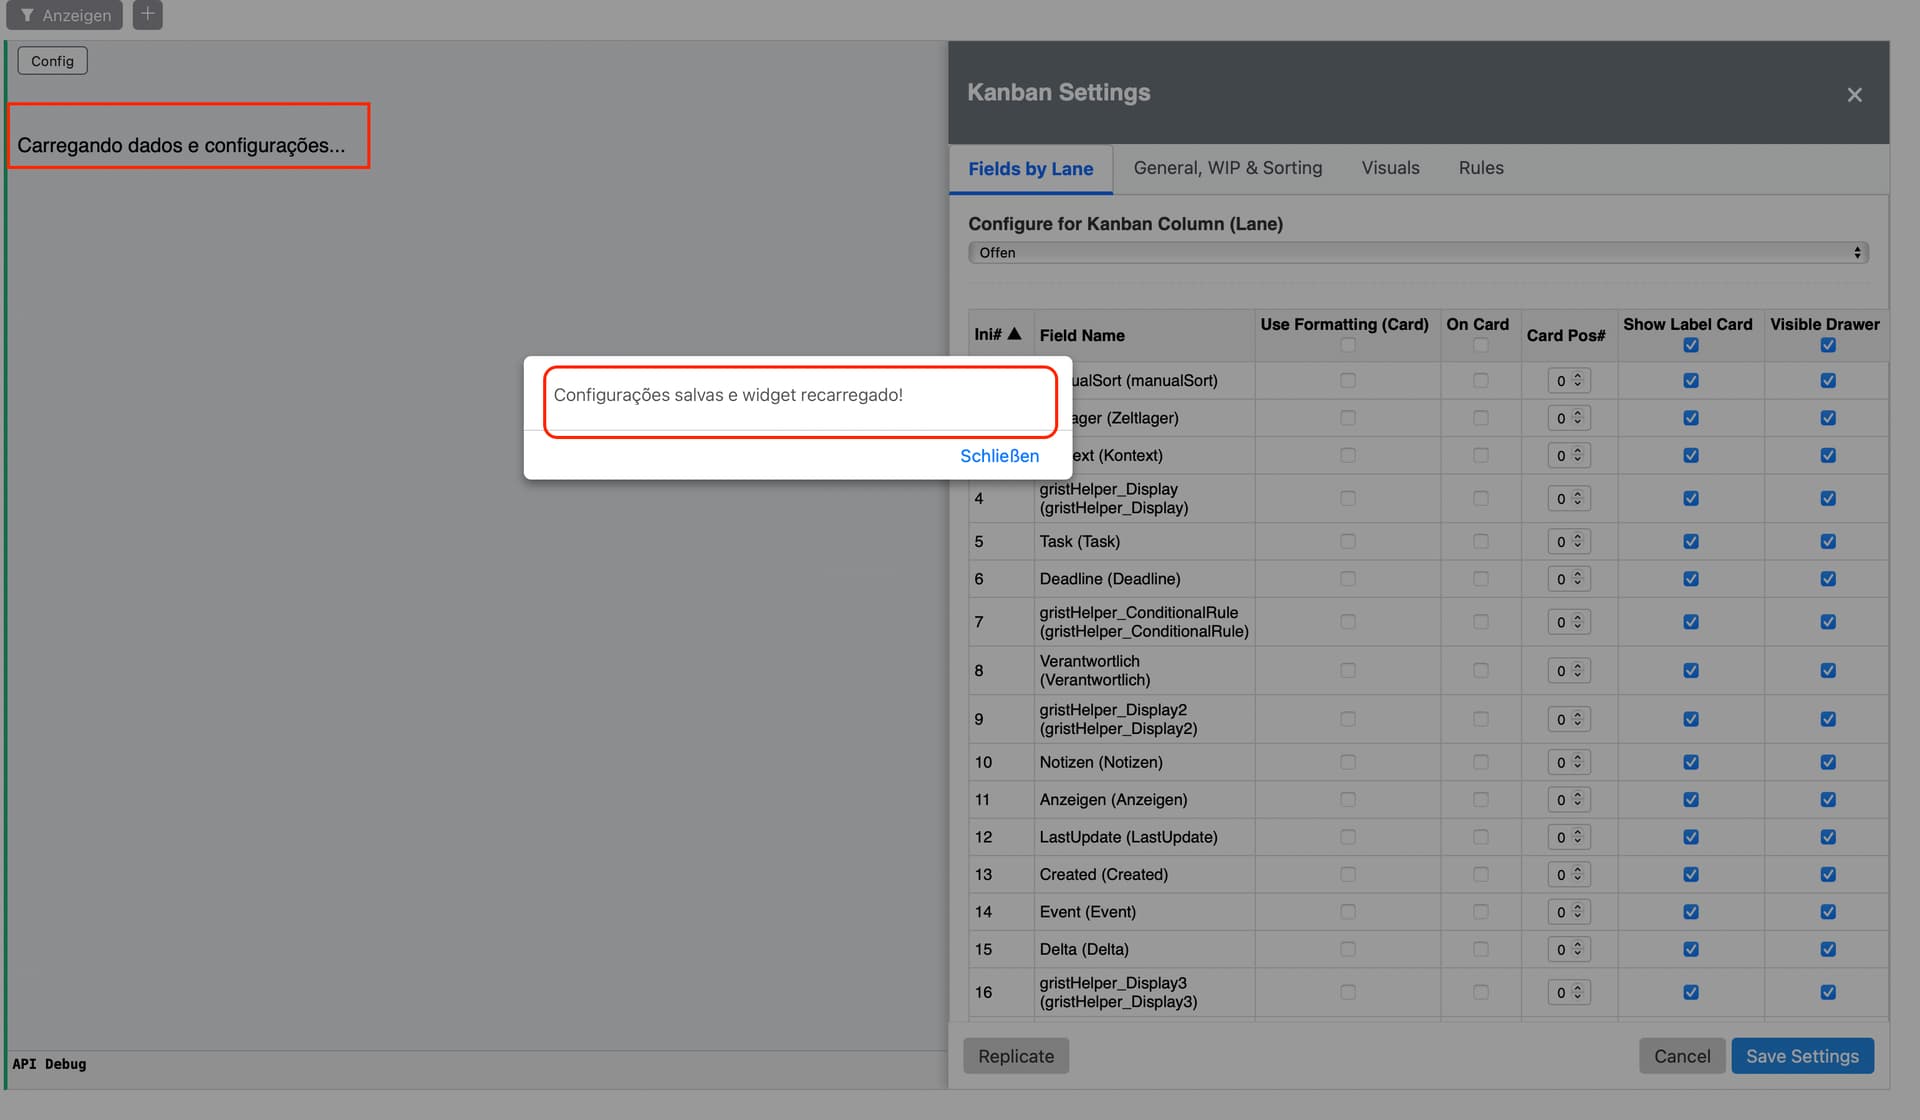
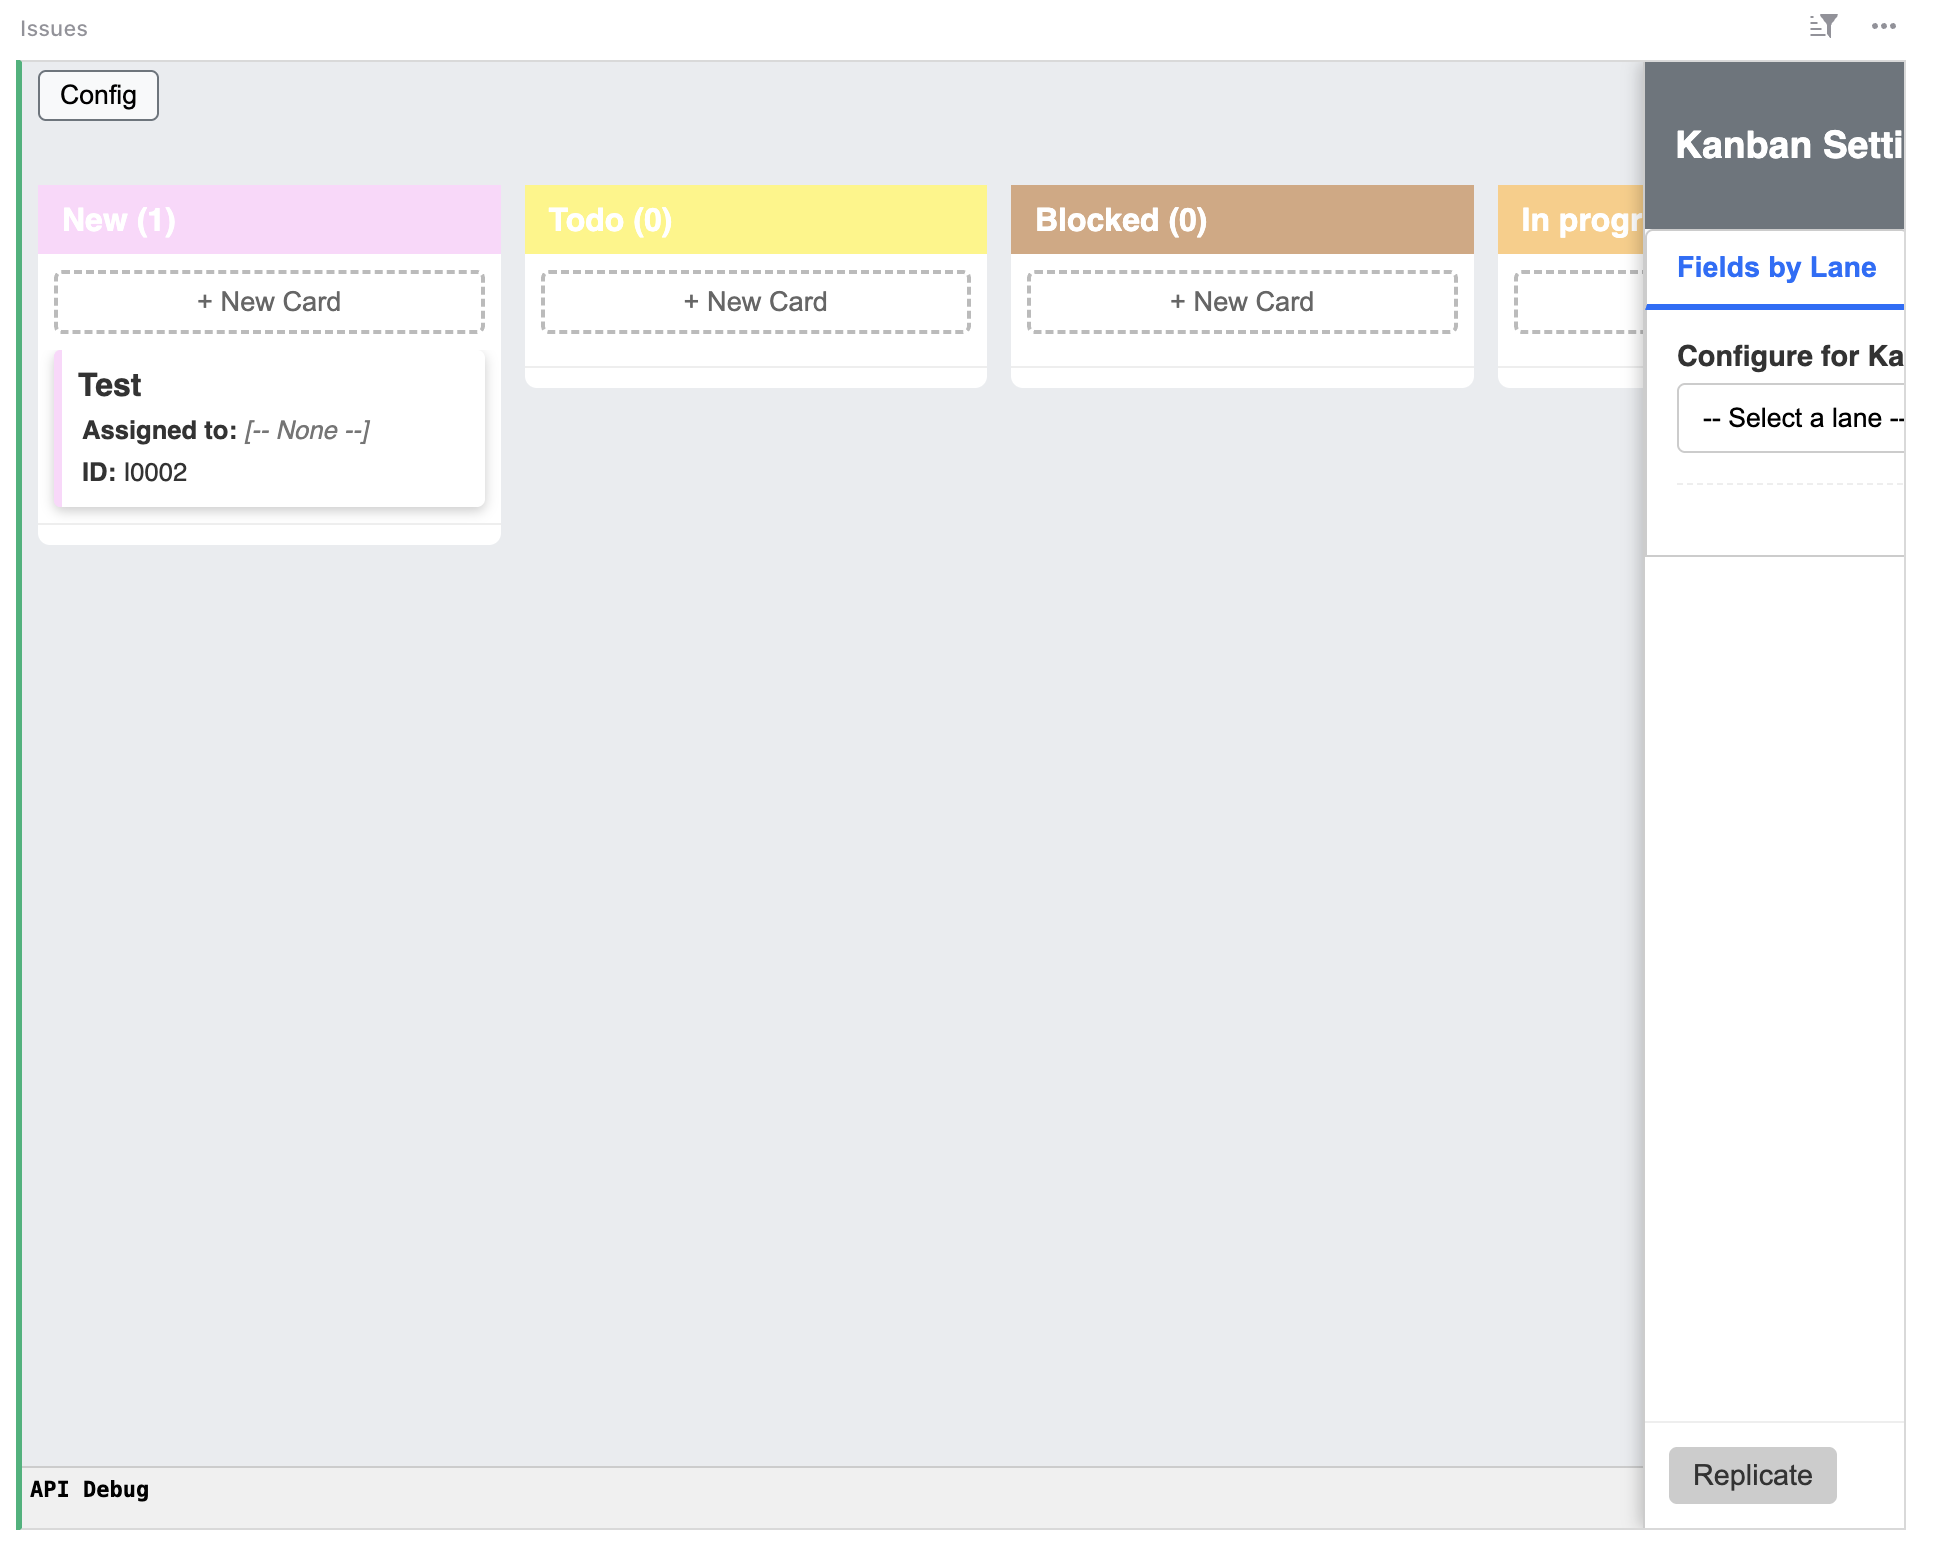
Tab: “Fields by Lane”

This is a powerful feature: you can control exactly what information is visible for cards in each specific lane.

  1. First, select a lane from the dropdown at the top (e.g., “In Progress”).
  2. A table of all your fields will appear. For each field, you can set:
    • On Card: Check this to make the field visible directly on the small card on the board.
    • Card Pos#: Control the order of fields on the card (0 is the title).
    • Visible Drawer: Check this to show the field in the detailed editing view.
    • Editable Drawer: Check this to allow the field to be edited in the detailed view.
    • Drawer Pos#: Control the order of fields in the detailed view.

:rocket: Pro Tip: Use the “Replicate” button to copy the field settings from the currently selected lane to other lanes, saving you a lot of time!

Tab: “General, WIP & Sorting”

This tab controls the core logic of your board.

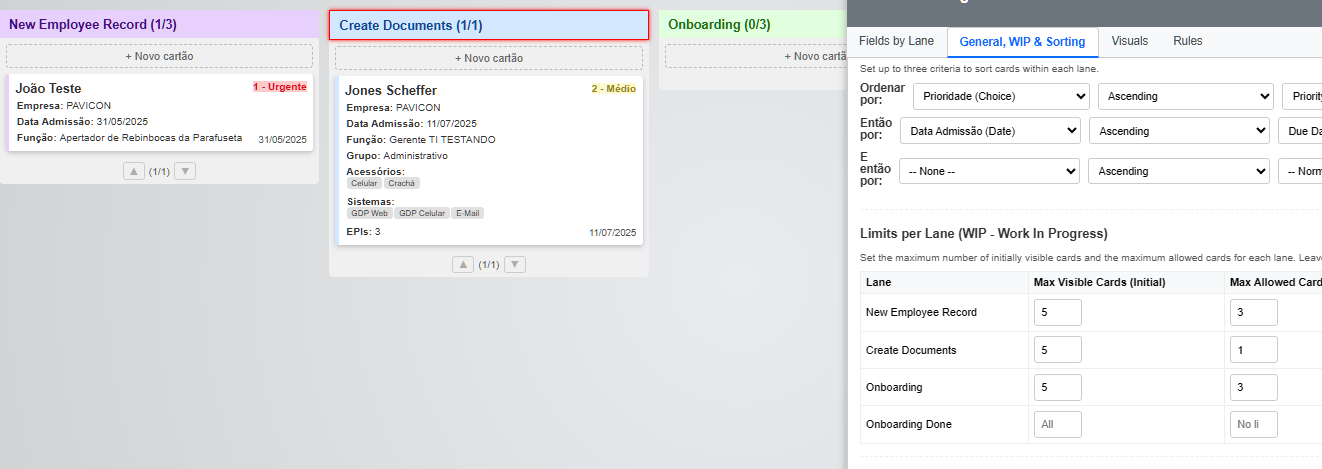
  • Card Sorting Within Lanes: Set up to three rules to automatically sort cards within each lane (e.g., sort by “Priority” first, then by “Due Date”).
  • Limits per Lane (WIP): Set a “Work-In-Progress” limit. For example, set “Max Allowed Cards” to 3 for the “In Progress” lane to prevent your team from working on too many tasks at once. The lane header will turn red if the limit is exceeded.
  • Movement Restrictions: Check the box to only allow cards to be moved to the immediately adjacent lanes (e.g., from “To Do” to “In Progress”, but not directly to “Done”).
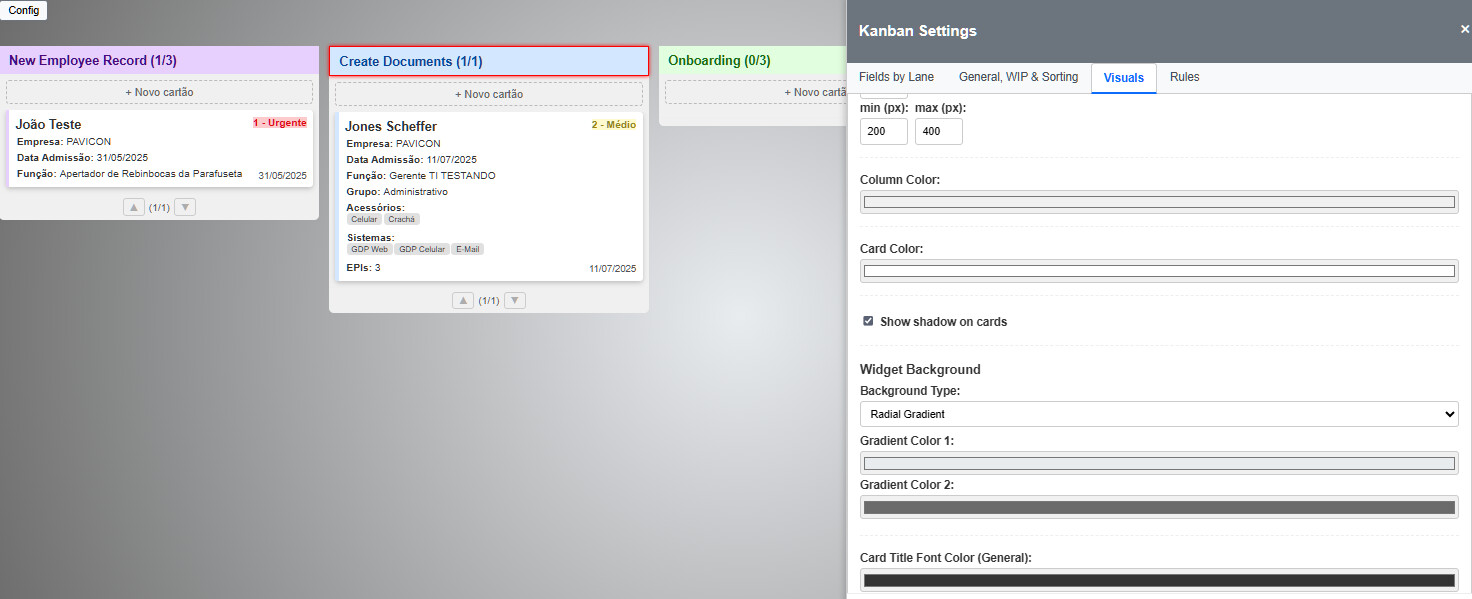
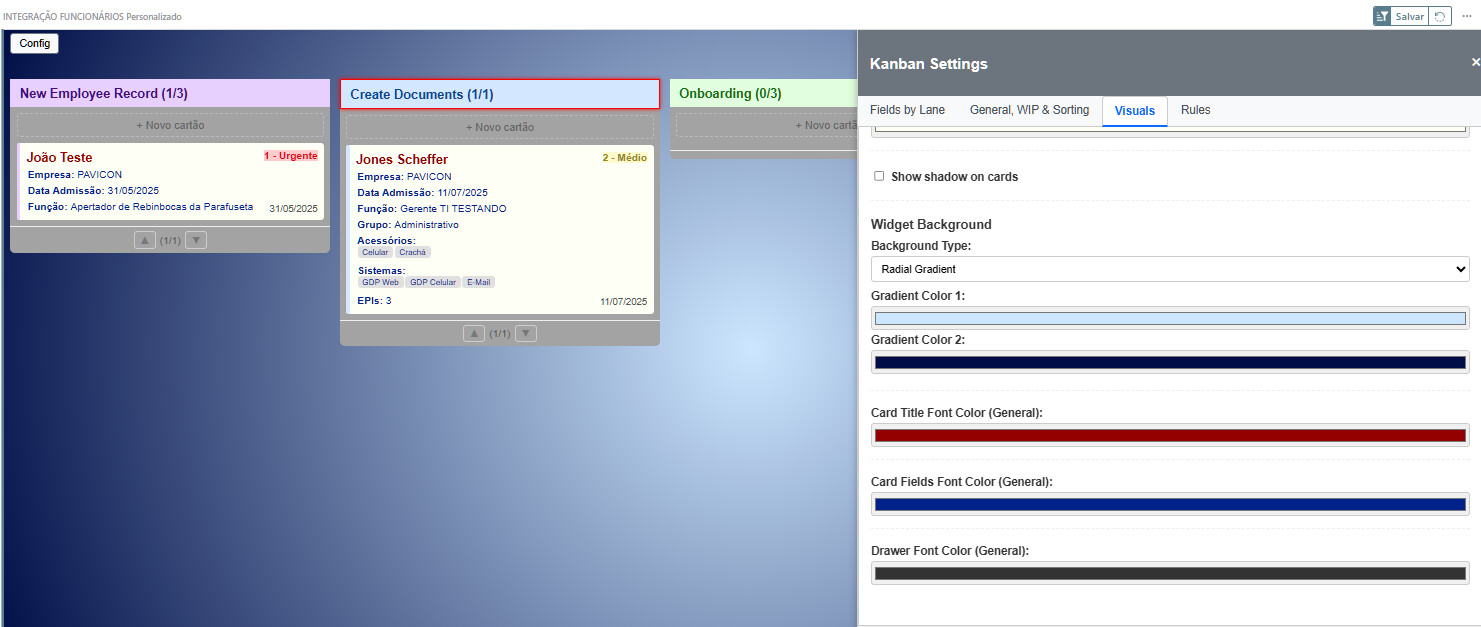
Tab: “Visuals”

Make the board your own! Here you can change:

  • Layout (Center columns)
  • Column and Card colors
  • Enable or disable shadows on cards
  • The overall background of the widget (solid color or a gradient)
  • Default font colors for card titles and fields.
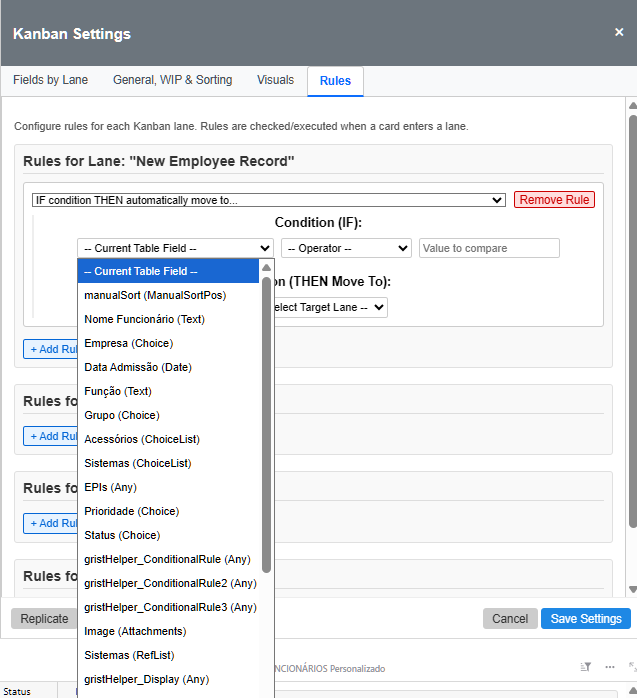
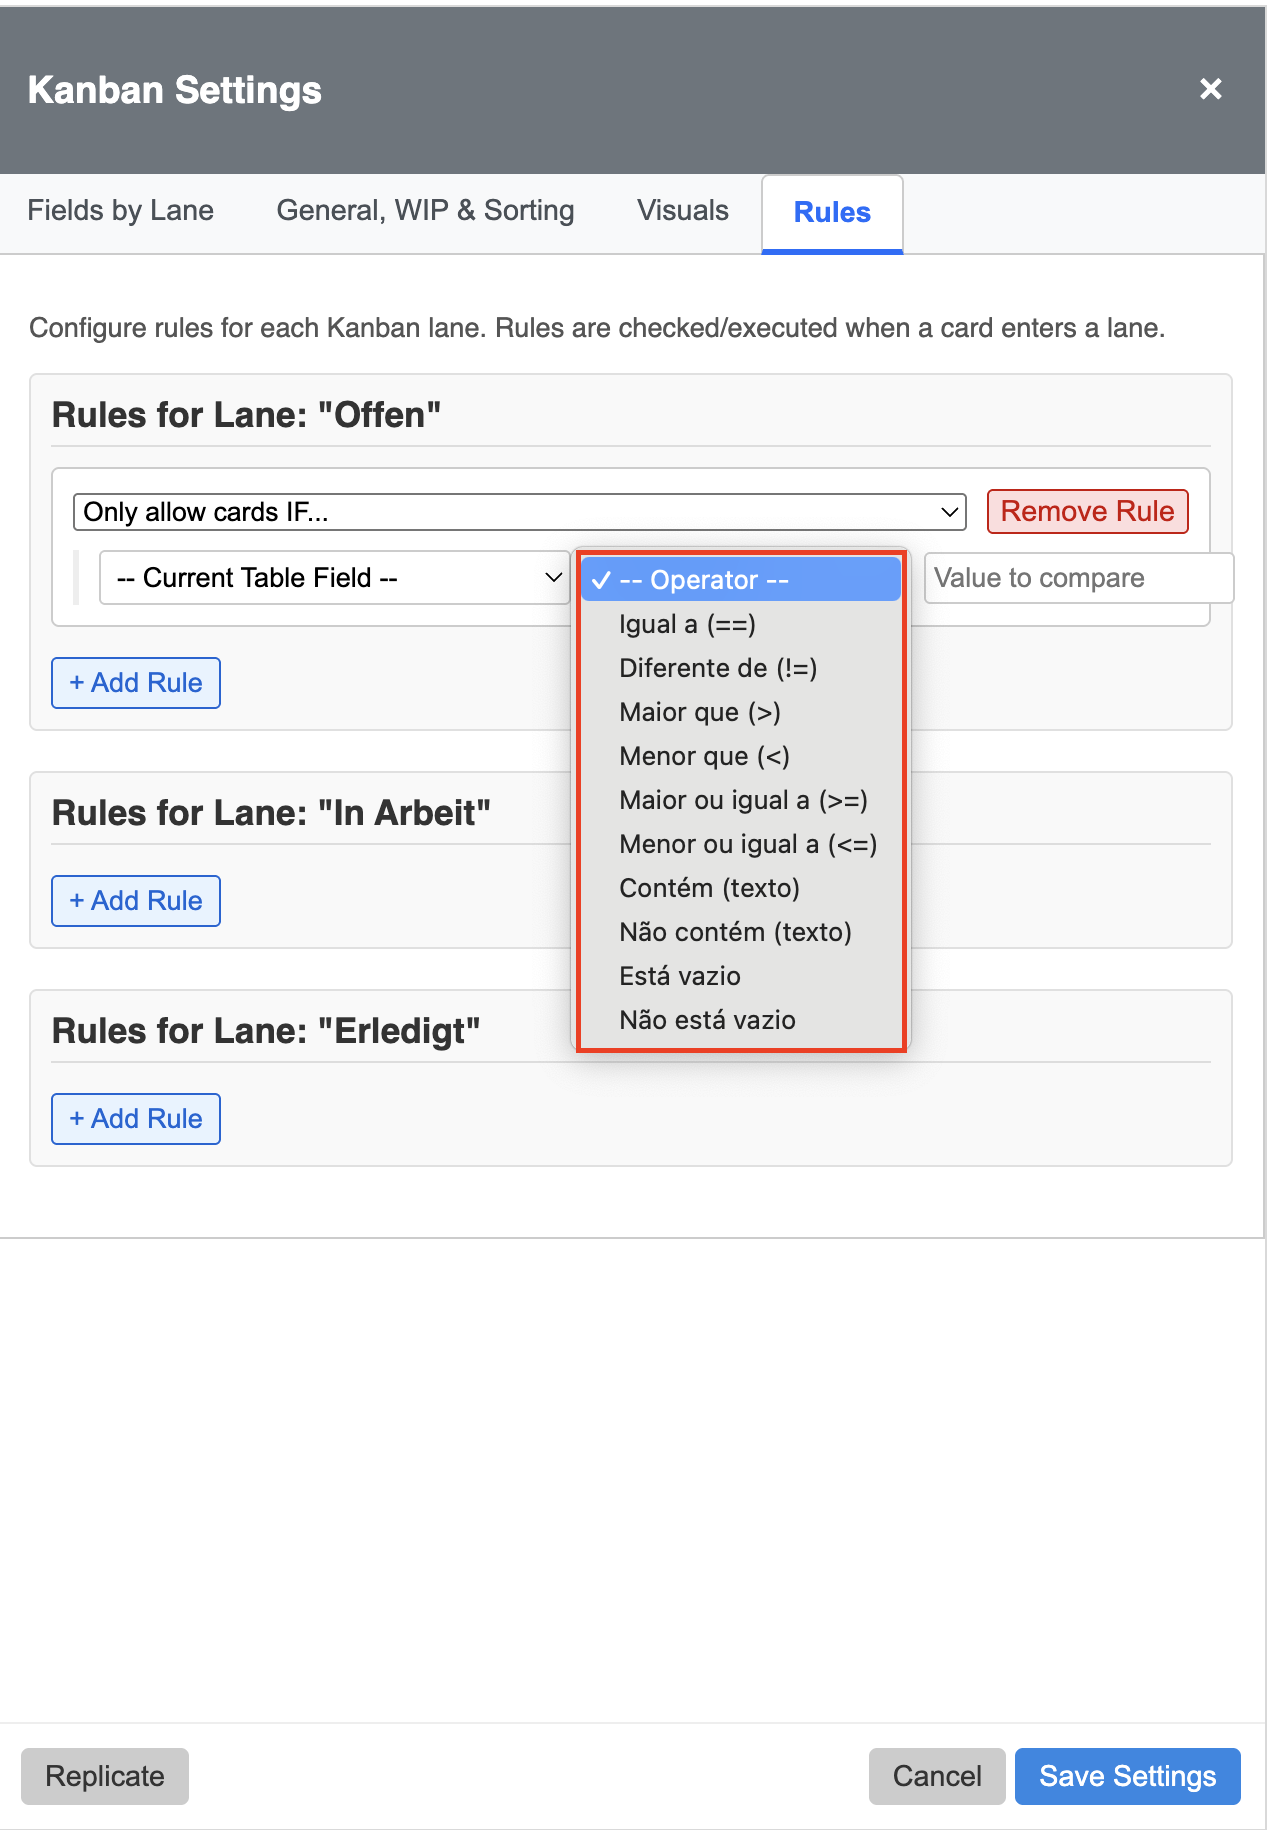
Tab: “Rules”

Automate your workflow with powerful rules that trigger when a card enters a lane.

  • Example 1: Allow Rule

    • Goal: Only allow cards into the “Review” lane if a “Manager Approval” checkbox is checked.
    • How: For the “Review” lane, add an “Allow” rule: IF field "Manager Approval" == true.
  • Example 2: Auto-Move Rule

    • Goal: If a card in the “In Progress” lane has its status changed to “Blocked”, automatically move it to the “Blocked” lane.
    • How: For the “In Progress” lane, add a “Move” rule: IF field "Status" == Blocked THEN Move To "Blocked".
  • Example 3: Create Rule

    • Goal: When a card moves to “Done”, automatically create a new record in a separate “Completed Work Log” table.
    • How: For the “Done” lane, add a “Create” rule and map the fields accordingly.

Section 4: Saving Your Configuration

After making any changes in the :gear: Config menu, always remember to click the blue “Save Settings” button at the bottom right.


Enjoy your new, powerful Kanban board

Section 5: Advanced Features

Once you’ve mastered the basics, you can unlock even more power with these advanced configurations.

Advanced Card Sorting and Layout

In the “General, WIP & Sorting” tab, the card sorting section has a special third dropdown menu. Besides Ascending or Descending, you can set a field’s display type to Priority (highlight) or Due Date (highlight).

  • How it works:
    • Priority (highlight): Select this for a field that represents task priority (e.g., “High”, “Medium”, “Low”). The widget will display this field’s value in the top-right corner of the card for high visibility.
    • Due Date (highlight): Select this for a date field. The widget will display its value in the bottom-right corner of the card.
    • If you have applied Grist’s Conditional Formatting to these fields (for example, to color-code priorities or make an approaching due date turn red), that formatting will also be displayed directly on the card.

:rocket: Pro Tip: For a powerful priority system, create a “Priority” column in Grist with choices like 1-Urgent, 2-Normal, 3-Low. In the Kanban sorting options, set it to sort Ascending and choose the Priority (highlight) display type. This will automatically place urgent tasks at the top of each lane and highlight them visually.

Creating Sub-tasks and Linked Processes with Rules

The “Create” rule in the “Rules” tab is a powerful automation tool that allows you to link processes across different tables. A common use case is creating a sub-task checklist for a main Kanban card.

Step 1: Prepare Your Sub-task Table

Before creating the rule, you need a separate Grist table (e.g., “Sub-tasks”) with at least these two essential columns:

  1. A Reference Column: Create a column of type Reference that points back to your main Kanban table (e.g., a column named “Parent Task” referencing the “Projects” table). This is how the sub-task knows which main card it belongs to.
  2. A Status Column: Create a Choice column to manage the sub-task’s own workflow (e.g., “Sub-task Status” with choices like “Pending” and “Completed”).

:rocket: Pro Tip: Want to pull information from the parent card into the sub-task table? Use Grist’s dot notation in a formula column. For example, to see the parent card’s name, create a formula column in the “Sub-tasks” table with the formula: $Parent_Task.Name

Step 2: Configure the “Create” Rule

Now, go to the Kanban widget’s “Rules” tab. Let’s say you want to automatically create a set of sub-tasks whenever a project card enters the “In Progress” lane.

  1. For the “In Progress” lane, click “+ Add Rule” and select the type: IF card enters THEN create in another table...
  2. Fill out the mapping fields that appear:
    • Target Table: Select your “Sub-tasks” table from the dropdown. The fields below will now populate with columns from that table.
    • Relation Field (Kanban card ID): This is the most important link. Choose the Reference column you created in Step 1 (e.g., “Parent Task”). The widget will automatically fill this with the ID of the card that triggered the rule.
    • Status/Lane Column (in Target): Choose the Choice column from your sub-task table that holds its status (e.g., “Sub-task Status”).
    • Initial Lane for New Card (in Target): A dropdown will show the choices from the status column you just selected. Choose the default status for newly created sub-tasks (e.g., “Pending”).

Step 3: Visualize Your Sub-tasks

You can now create a second Kanban widget on a new Grist page and point it to your “Sub-tasks” table. Use the “Sub-task Status” column as its main Kanban column.

Now, you have a complete system:

  1. When you drag a “Project” card to “In Progress” on your main board…
  2. A new sub-task card is automatically created in the “Pending” lane on your second board.
  3. You can manage the sub-task’s lifecycle on its own board, while it remains linked to the parent project card. This is perfect for managing complex projects with distinct sub-processes.
3 Likes

I will soon include the possibility of attachments. I haven´t because in my test environment I get mixed content errors, because my self hosted Grist is on http and the browser blocks images and such coming from an HTTPS host (GitHub)

Hi @Rogerio_Penna,
as promised I tried out your widget. It looks very promising. I don’t have a use case for the advanced features like rules that you implemented, so I didn’t test them. The basic functionality of the Kanban worked for me.

I ran into some issues though:

  • The englisch translation is very incomplete. There is still a lot of stuff that is in Portuguese if I select English.
  • Unfortunately the option for English language does not stick. When I leave the page with the widget it is back to Portuguese although all other configurations stay in place
  • The widget does not respect any filters or “Select by” another widget that I set in grist. It always shows everything in the table
  • I was able to select a reference column as the status column. But the it just shows the record ids instead of the display text and also it does not update the reference column in a correct way. I don’t know if you want it to be able to use references instead of choice columns as status, but it could open some interesting possibilities.

" * The englisch translation is very incomplete. There is still a lot of stuff that is in Portuguese if I select English."

as it should be. I plan to leave a single superior language in the future, classical Latin. Supra terra britanorum, volat aquila legionum!

just kidding, will check that.

" * Unfortunately the option for English language does not stick. When I leave the page with the widget it is back to Portuguese although all other configurations stay in place"

did you save the widget options? Just like you save filters on Grist?
EDIT: turns out I just tested it and it’s really not saving the language settings.

there is no way around it. To permanently save widget options for even a reload, you need to save the widget options (unless the options are saved in a table)

  • The widget does not respect any filters or “Select by” another widget that I set in grist. It always shows everything in the table

what would your use case be for that? It does not respect select by other widgets because there is no such feature, and right now I am not sure what would be its use.

  • I was able to select a reference column as the status column. But the it just shows the record ids instead of the display text and also it does not update the reference column in a correct way. I don’t know if you want it to be able to use references instead of choice columns as status, but it could open some interesting possibilities.

That could be done in theory. However, since a reference column represents a table… and the table would be editable… anyone would be able to insert new process stages by editing the referenced table. That would mean you would need extra permissions management, so it would be harder for someone to edit the table and create new stages, etc.

As Choice Column, its much simpler to forbid anyone but Owners to change it.

  • The englisch translation is very incomplete. There is still a lot of stuff that is in Portuguese if I select English.

Hendrik, I checked and found NOTHING in Portuguese, when changing language to English.

Maybe I am blind, just as when my wife tells me the socks I am looking for are in the drawer and I AM LOOKING IN THE DRAWER AND NOT SEEING ANYTHING!!!

can you provide screenshots or more details of the missing translations???

Hi @Rogerio_Penna:

I have the screenshot with the missing translations attached. Yesterday I had the feeling it was more than these, but maybe this was due to is always switching back completely to Portuguese.

As for the use case for filters/selection by other widget: I have on big table with all the tasks. But these are associated to different projects and stages of the project. I don’t want to see everything at once. Filters in grist give you great freedom to choose what to display and what not to display as I can just use a formula column that gives me numbers or True/False values based on what I want to see. I use this all the time. E.g. I could make a filter column that is true if the deadline is within in a certain time range and by this only show tasks that are due in a short time.
Selection by widget can be used to choose different projects, e.g. using the drop-down custom widget or for a search feature using the simple table filter widget.

1 Like

Ok, thanks for the info on what parts are not being translated.

The “No Li” is actually translated. Notice that if you choose Portuguese, it displays “Sem”

That is actually just bad design. There is no space in that box to show the terms “Sem Limite” (Portuguese) and “No Limit” (English). I will see if I can insert a universal “infinite” symbol there.

added french language and already fixed those problems


NEW OPTION - Classical Latin. For everyone who thinks constantly about the Roman Empire

pushed to Github.

try again with the translations etc

As for the filtering by other widgets, I will have to change a lot of logic of the widget in the way it fetches data

doable, but it will take time

@Rogerio_Penna: I can confirm that the language setting now stays the way I select. I found only two minor things remaining in portuguese. (see screenshot).

as for filtering: looking forward to it.

fixed that too.

Also… 8 new languages added: arabic, chinese, german, hindi, italian, japanese, dutch and russian

Just chiming in here to let you know: I think it’s totally awesome that you included classical Latin. :rofl: Roma invicta!

1 Like

it was a highly requested feature. :rofl:

don´t get me started how the Lusitan War around 150BC between Rome and the Lusitans (southern Portugal) tribe affected mostly and IRONICALLY the languages of Portuguese and Italian, when it comes to date writing.

Now I need to add textures for backgrounds and cards and stuff, and add a Roman Theme Kanban board* (Tabula Indicaria)

2 Likes